


MO Wrenching: How To Set Suspension Sag
Proper sag is the starting point of all suspension tuning


Lots of motorcycles now come with the full complement of adjusters on their suspension. However, even the most basic bike will let you, at the very least, adjust the rear preload. Let’s take a look at how you can set your bike’s suspension sag to get the most out of their damping capabilities.
Why Is My Suspension So Stiff?
Adjusting Motorcycle Suspension
Proper sag is important for two reasons. First, a suspension unit needs a certain amount of room within its travel to work properly. If you have too little sag, your bike will be prone to “topping out” the suspension as it extends to its limit. Similarly, too much sag could allow you to experience the unpleasant jolt of “bottoming out.” Second, once your sag is set, you will be able to ascertain whether or not your suspenders’ spring rate is correct for your weight and size.

Your bike’s sag is broken into two categories: “static sag,” the distance your bike compresses its suspension from fully extended when you and your riding gear are aboard, and “free sag,” the distance your bike settles from full extension under its own weight. Using the algebra you suffered through in high school and an equation popularized by Race Tech founder Paul Thede, you’ll be able to determine whether you need to increase or decrease your preload to reach the magic combination.
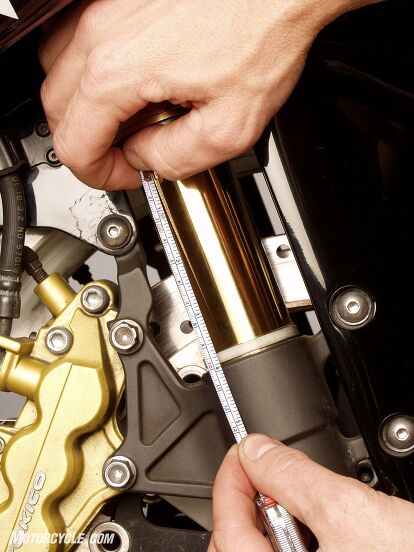
In order to measure the static sag, you’ll need two assistants. A metric tape measure will also make the calculations easier than a SAE one. Before you mount the bike, you’ll want to measure the suspension when it’s completely topped out. For the fork, lift on the grips until the front wheel begins to come off the ground. On traditional forks, measure from the stanchion wiper to the bottom of the triple clamp. Measure from the wiper to the top of the axle clamp on inverted forks. We will name this number L1 and write down the measurement.
Now, it’s time to do it while you’re on the bike. Have one of your assistants hold the bike from the rear while you get into your riding position. Your other assistant should push down on the fork and let it slowly rise up until it stops. The new measurement will be called L2. The front end should now be lifted and allowed to settle slowly down until it stops, forming measurement L3. Exactly in the middle of measurements L2 and L3 is the point the fork would want to live in a frictionless system. So, the average between the measurements would be (L2+L3)/2.
Armed with this information, you can determine the static sag by subtracting the average measurement calculated above from L1, or to write it out as an equation: static sag = L1-(L2+L3)/2. (Aren’t you glad you stayed awake in class that day?) Now that you’ve got this number, what does it mean?
For street riding, suspension gurus generally agree that between 30 to 35mm (1.2-1.5 inches) is optimum sag. If you’re track-bound, a stiffer 25 to 30mm (1.0-1.2 inches) is preferred. If you have too much sag, you’ll need to increase the fork’s preload. Conversely, if you have too little sag, back off on the preload a bit. The jockey-sized and big-boned members of the audience may be wondering if they should fiddle with these figures to account for their mass. In a word, no. The static sag figures are an accepted constant. Measuring the bike’s free sag will reveal if any alterations need to be made for rider size.
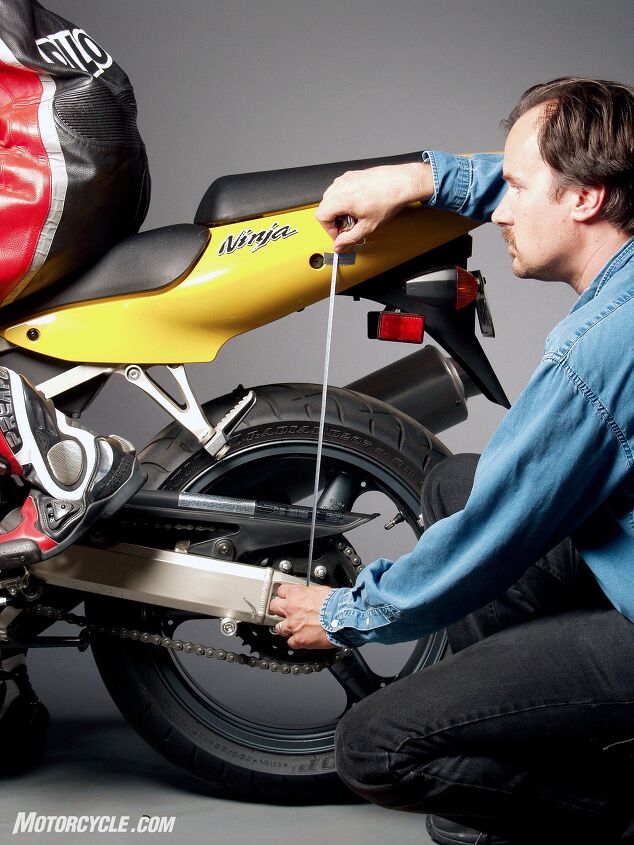
Once you have the front suspension dialed in, repeat the process with the rear suspension. The key to getting accurate measurements out back is to pick a solid point on the frame or bodywork directly above the axle. If you don’t measure straight up from the axle, you may get inaccurate numbers.
Now that the static sag is set, the rear free sag means something. Measure the amount the bike sags under its own weight. If you want to be really anal, you can use the equation above, but a single quick measurement will tell you if your spring rate is in the right zip code. The free sag should be between 0 and 5mm. Simply lifting the weight of your bike to see if it moves up slightly before topping out the suspension will give you an idea of how much free sag it has. While this may not seem to make sense, if your suspension has no free sag, your spring rate is too soft. The soft rate forced you to use too much preload to get the desired sag. If you have a bunch of free sag, your spring is too stiff.
You’ve successfully set your sag. Now, you can move on to the other adjusters confident that you have a good baseline.
[This article was adapted from Evans Brasfield’s book 101 Sportbike Performance Projects. Learn more about it here. Read the MO review here.]

Like most of the best happenings in his life, Evans stumbled into his motojournalism career. While on his way to a planned life in academia, he applied for a job at a motorcycle magazine, thinking he’d get the opportunity to write some freelance articles. Instead, he was offered a full-time job in which he discovered he could actually get paid to ride other people’s motorcycles – and he’s never looked back. Over the 25 years he’s been in the motorcycle industry, Evans has written two books, 101 Sportbike Performance Projects and How to Modify Your Metric Cruiser, and has ridden just about every production motorcycle manufactured. Evans has a deep love of motorcycles and believes they are a force for good in the world.
More by Evans Brasfield


Comments
Join the conversation
One of the better articles I have read on this adjustment - well done. One minor quibble:
"If you’re track-bound, a stiffer 25 to 30mm (1.0-1.2 inches) is preferred."
It's not stiffer, it's just more extended. I just don't like this sentence because it perpetuates the myth that adding preload makes the suspension feel stiffer - it doesn't, it just provides more travel before it bottoms out. I know the author understands this because everything else in the article about the function of preload is 100% correct.
Oh and one other little tip....if you have a lot of stiction in the front (big difference between the "stuck up" and "stuck down" measurements), you can often reduce that by dialing out all of the rebound and compression damping before you measure sag. Your measurements will also be more repeatable if you minimize the damping. Just count the clicks or turns so you can put everything back where it was once you finish adjusting the sag.