

Road Racing Series - Part 7
Now you have the basics. You know the minimum it takes to get your bike on the track and the top three priorities of where to spend your racing funds first. If you have some cash left over, this is how to continue:
Protection
As the old saying goes, "There are two kinds of racers; those who have crashed and those that are going to crash." Finding the limits of traction, then slipping past them and crashing is something to be expected, especially for a beginning racer. Just like you protect your body with a helmet and leathers you need to protect your bike from damage.
Crash protection on a race bike has a different function than it does on a street bike. It's not to protect your custom paint job when an old lady backs into your parked bike in the Wal-Mart parking lot. On a race bike it protects expensive parts like frames and engine cases. It may be the difference between having your bike back on the track later that afternoon and having your weekend end prematurely. It also keeps stray bits and pieces that could be a hazard to other riders off the track (Some tracks charge you a clean-up fee if you leave oil or coolant on the asphalt.)
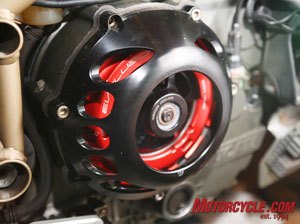
As you consider how to go about protecting your bike, think about what parts stick out the furthest. "Basically you want to protect the things that hit the pavement first," Speedy Moto's Christian Hansen told me.
On the 748, these parts are the clutch cover on the right side and the water pump housing on the left. Speedy Moto makes reinforced versions of both of these parts, designed to take the abuse of a crash.
Some racing organizations require that the engine case covers on certain models, like the GSX-R series and the R6, be replaced with reinforced aftermarket pieces. These pieces are available from companies like Lockhart Phillips, Vortex and Woodcraft.
Frame sliders supplement but don't replace these reinforced pieces. Their hard nylon or plastic ends can be replaced in the case of a crash.
There is a debate over whether or not to use "through" or "under" the bodywork frame sliders. On a street bike, the common through-the-body sliders will protect your paint during a low speed crash or a tip-over. But at race speeds the longer sliders can do more damage than good. It's simple physics. Longer sliders will put a greater torque on the frame they are designed to protect when a crash is at high speeds. They can turn a low-side into a high-side as your sliding motorcycle leaves the pavement and the longer sliders plow into the dirt to launch the machine airborne.
"You're not trying to protect the fairing," Hansen said. "The fairing is part of your crash protection."
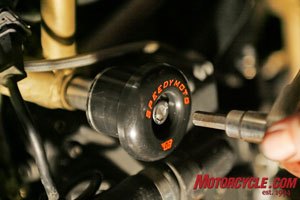
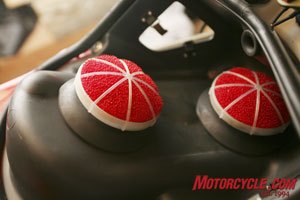
Speedy Moto's under-bodywork sliders fit against the inside of the fairing, close to the frame but still sticking out further than any of the Ducati's hard parts. On the Ducati, the frame sliders interfered with the stock battery, giving us an excuse to change to a smaller, lighter and maintenance-free Yuasa YTX7L-BS battery.
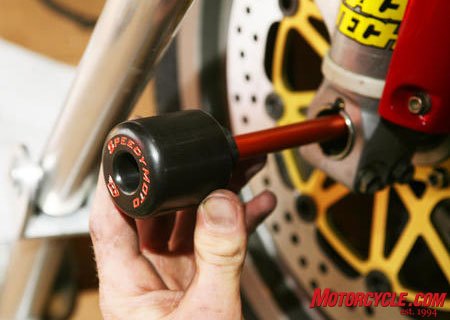
Speedy Moto also makes lightweight front axle sliders that keep the front forks or rim from skidding down the pavement. Motorcycles with conventional dual-sided swingarms can attach sliders to the swingarm as well.
To round out our protection package, we used Vortex's replaceable hard plastic bar-end sliders on our clip-ons.
Engine/Exhaust/Intake Modifications
As previously mentioned, Supersport classes exclude costly and complicated internal engine modifications. This doesn't mean you don't have an excuse to open up your engine. Check the valve clearances. Take the time to do a compression and leak-down test. Find and correct any problems. (CCS only allows a 1mm overbore in case of an engine rebuild.) It would be a shame to spend all of this money and effort preparing for your first race weekend only to have it end prematurely as you coast off the track in a cloud of smoke.
On the Ducati I delved into the notorious Desmoquattro heads. All the valve clearances were within tolerance thanks to the Martin Brickwood Performance hardened collets that I had installed years ago when the Ducati was still a daily commuter. Checking the valves on a Ducati also means it’s time to replace the Kevlar belts that run the cams. The old belts were swapped for a set of Bucci aftermarket units from Lockhart Phillips.
In a Supersport class, for performance gains you must work outside the engine. Start with your air intake system and work your way back. Aftermarket filters de-restrict air flow. Race-specific air filters usually push the balance between letting air in and keeping dirt out. When replacing the stock bodywork with Sharkskinz (see Section 8) we opted to go with oversized air runners that do away with the Ducati's stock filter location. The replacements we used came from Mad Duc, were light and simple, and fit over the Ducati's "velocity stack" air intakes.
Once air mixture has passed through the cylinder it has to get out, and de-restricting the exhaust is as important as opening up the intake side of things. Although full "race" exhaust systems are available, most sportbikes come from the factory with an excellent header if the engine internals (bore diameter and valve area specifically) are left stock. The most affordable and easiest modification is to add a slip-on or bolt-on system after the mid-pipes.
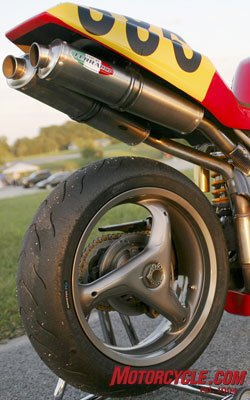
I had experimented with many brands of exhausts while the Ducati was a streetbike before settling on units from world-famous Ducati tuners Fast by Ferracci. The units retain the stock 45mm size of the mid-pipes and are made out of titanium. I chose the titanium both for its longevity over carbon fiber and to help reduce weight for the mufflers that mount high under the tail.
In carbureted motorcycles, the jetting must be changed to match the pipe. The exhaust manufacturer usually has a recommendation that can be fine tuned on a dyno or trackside.
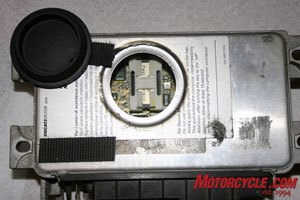
If a bike is fuel injected, then its fuel mapping is controlled by the ECU (Electronic Control Unit). Certain brands of motorcycles can have their fuel mapping changed by replacing the stock EPROM (Erasable Programmable Read-Only Memory) chip with a chip that tailors the fuel delivery. We complemented the Ferracci system with the company's Stage 1 EPROM.
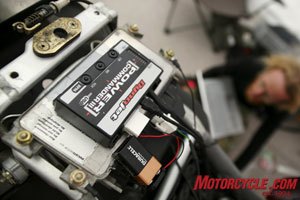
All fuel-injected motorcycles can have their fuel delivery managed by a Power Commander unit from Dynojet Research. The units have a 100 percent range of adjustability and plug in neatly to a motorcycle’s stock wiring harness (no cutting or splicing required). A wide range of map applications are downloadable from the company’s website and can be uploaded with a computer. They can also be adjusted trackside without a computer using buttons on the unit.
Dynojet supplied us with a Power Commander III USB model. Installation is simple, with the PC mounting on top of the ECU and plugging into the wiring harness. The process takes about 10 minutes. For those not familiar with the newest generation of Power Commanders, they have been greatly improved over the years. USB connections make syncing the PC with a computer a snap. Power Commander USBs are supplied with an auxiliary power unit that uses a 9V battery so that you can modify maps without having to start your engine (especially nice when you’re working inside a garage). The PC III USB also interfaces easily with Dynojet's other products, such as its Quick Shifter discussed below.
Both EPROMs and Power Commanders can be custom designed and dyno-tuned for a specific motorcycle. This is the final step in engine modification. Have your fuel map tweaked to the air filter, exhaust and fuel you will be using on the track. Dynojet lists dealerships on its website which have this capability.
Transmission and Clutch
Anyone who reads about race bikes has heard of reverse "GP" style shifting and quick shifters. Do you have to have them? No. Will they make a beginning rider go faster? Probably not. Then why should a newbie racer have them? If you plan to keep at this racing thing for a while, eventually you will need to be able to use a reverse shift pattern and a quick shifter, so why not just learn how to from the beginning.
“Reverse" or "GP" shifting means that you shift in a one-up-and-five-down pattern (the opposite of most street machines). You'll put your toe under the shifter and raise it to shift "down" and you'll push down on the lever with your toe to shift "up." Sound confusing? It's much easier to get used to in real life. The theory behind it is that when your bike is leaned over to the max and you're accelerating out of a corner, you probably don't have room to get your boot between the shifter and the asphalt to catch another gear.
GP shifting requires no modifications to your transmission, just a few changes in the external gear-shift mechanism. Most aftermarket rear-sets are supplied with the necessary linkages to convert your shift pattern (see Section 11 in the next article for more info about rear-sets).
A quick shifter allows you to shift to a higher gear without using a clutch or rolling off the throttle. Down-shifting is still accomplished in the old-fashioned squeeze the clutch and blip the throttle style. Of course all beginning racers should learn how to shift without a clutch by loading the shift lever and quickly snapping off the throttle if they haven't already learned this trick on the street. But no matter how good you are shifting this way, a quick shifter is faster and smoother and you never have to let off the gas.
Installing a quick shifter is easy on a fuel injected motorcycle. Dynojet makes a model that interfaces with its Power Commander unit. A sensor attached to the shifter (specific for each model) sends a signal to the Power Commander to interrupt the ignition (watch the Speed Channel closely and see the ball of flame that comes out of a pro's tailpipe as the ignition cuts back in on a cylinder and ignites an exhaust system full of un-burnt fuel).
The Ducati uses a shift linkage between the lever and the shift axle on the transmission. When the shift pattern is reversed the linkage "pulls" to make an upshift. With its Quick Shifter kit Dynojet supplies a two-piece link rod that incorporates a sensor in the middle. The sensor detects when the rod is "pulling" and sends a signal to the Power Commander. The length of the interruption, along with a lower rpm limit where the DJ Quick Shifter will work are adjustable with a computer via the normal Power Commander connection.
Supersport clutch modifications involve preparing your clutch for the rigors of the race track. Clutches can be modified with aftermarket plates and springs for more positive engagement and to withstand the abuse of full-power starts and high-rev downshifts.
Engine braking, especially on high-rev V-Twins can be an issue on the track, causing rear-wheel slides and overtaxing rear suspension. The solution is a slipper clutch, a simple mechanical design that allows the clutch to partially disengage when the rear wheel is pushing the chain. ("If you use your transmission as a brake, it will break," Aaron Stevenson warned us during the No-Braking drill at his Cornerspeed school). The downside is that your slipping clutch plates will wear out quicker.
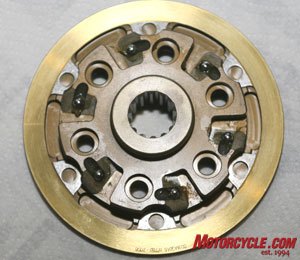
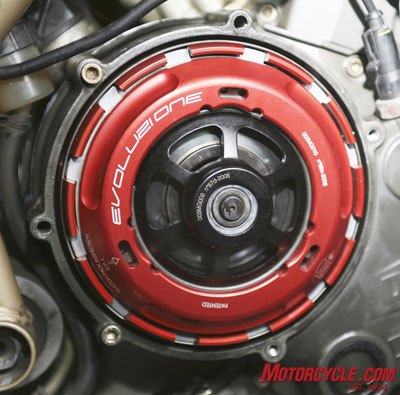
STM, the Italian company who invented the slipper clutch, supplied us with its Evoluzione unit. The STM clutch works by using a series of 45-degree ramps inside the clutch hub. When the rear wheel is pushing, the ramps are forced apart which separates the plates and disengages the clutch, essentially allowing the rear wheel to travel at a different speed than the engine/transmission. When you're back on the gas the ramps move in the opposite direction, locking up and allowing the clutch plates to engage. All of these actions take place in fractions of a second.
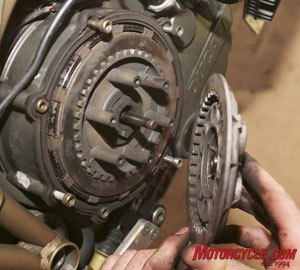
The Ducati's dry clutch (which means the clutch components do not run in the engine oil inside the case) makes the STM installation simple. Just slip off the clutch cover and the unit is exposed. No need to drain oil or replace gaskets.
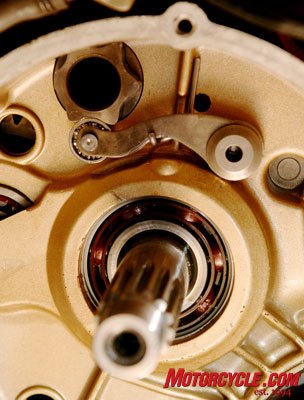
While the clutch was removed, we went ahead and installed a shift kit from Factory Pro. A motorcycle's "constant mesh" transmission is held in gear by a shift "star" mechanism and a detent arm. How smoothly the bike changes gears and how well it stays in gear (and doesn't catch false neutrals during shifts) are based on these parts. Smooth shifting contributes greatly to the overall smoothness of riding. Quick and positive shifts keep the chassis stable at critical times, like when you're gearing down and setting up a corner.
Depending on the model of motorcycle, Factory Pro supplies a shift star, a detent arm with a roller bearing head and a stronger spring. The kit requires for the clutch to be removed, the oil to be drained and the right-side engine case cover be removed (something that you would have to do anyway if you're modifying the clutch on a machine that uses a wet clutch). Getting there is the work. Swapping the parts out is easy. For the 748, Factory Pro supplied the shift arm and a stronger spring, using the stock shift star.
Installing the STM slipper clutch was straight forward with the included directions and well within the basic mechanic's skills. A few special tools are required, such as a clutch basket holder in the style of those made by Motion Pro. STM also recommends its special holder to keep the clutch's slipper mechanism and its associated ball bearings together during assembly. In the absence of this tool we simply used safety wire to hold the pieces together, then snipped the wire and pulled it out after they were safely secure in place.
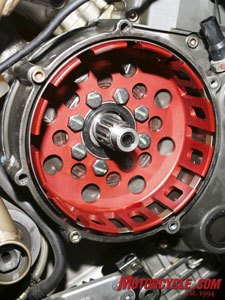
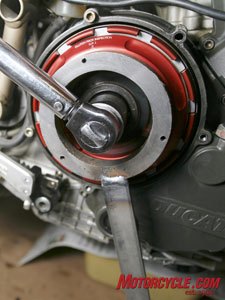
While STM's basic "original" clutch uses a conventional basket that can be held in place with the Motion Pro tool, the Evoluzione unit requires its own special holder. The $150 tool is available from any company that carries the clutches. Under the gun, we had one built at a local machine shop that did the trick. It's important to either buy or make these holders, because should your clutch plates need a trackside swap, you'll need to have one in your tool box.
Although STM cut its teeth on designing dry clutches for Ducati motorcycles, it now also make units for the "wet" clutches that reside in most Japanese sportbikes.
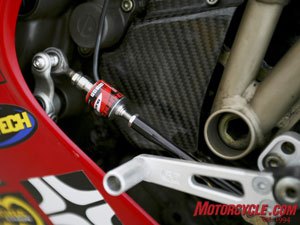
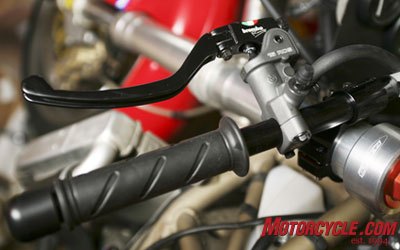
As a final modification to the clutch system Brembo supplied us with their 16 RCS radial master cylinder. Ducatis and many other sportbikes have their clutches actuated by a hydraulically pushed rod, instead of pulled by a cable. A mirrored version of its front brake master cylinder, the 16 RCS puts the lever nearer to the handlebar and gives an improved and positive feel to clutch engagement. If your bike has a hydraulic clutch, the same principles of brake fluid, stainless-steel lines and bleeding, that we went over in our discussion of brakes applies here.
Driveline
Since the stock transmission cannot be modified on Supersport machines, all gearing changes are controlled by the sprocket ratios on the final drive.
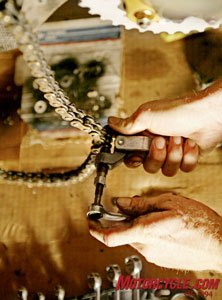
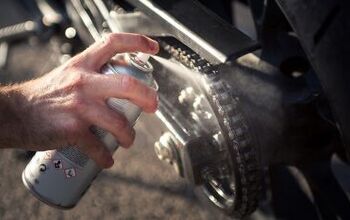
Chains are like tires. You should use the best one you can afford. Compared to a street chain, race chains are stronger to withstand the abuse they'll be given. On a street bike, O-rings extend a chain’s life and decrease its need for maintenance. On a race bike the little pieces of rubber sap power and are not normally used (again, another reason not to use “race” parts on a “street” bike). Regina supplied us with its GP model chain. Depending on your bike, you may want to install a guard to protect your engine’s case if the chain breaks.
Sprockets are the Supersport racer's only opportunity to change their machine's gearing. You can look for recommendations for your specific model, but most bikes need to be geared down by dropping teeth on the front sprocket or adding them to the rear to optimize performance. Changing to aluminum sprockets will save weight but shorten the sprocket's life. Racers can also opt to convert to a 520 size chain when replacing chain and sprockets, another weight-saving trick, though one that again shortens the life of the chain.
The 748's single-sided swingarm makes chain and sprocket maintenance a snap. The rear wheel can be removed with a single nut, leaving the axle, brake caliper and rotor and drive chain untouched. The chain is adjusted by turning one eccentric bearing, with no alignment issues. The only downside is when the stock rear sprocket has to be replaced the rear hub must be disassembled to remove the complicated machined piece.
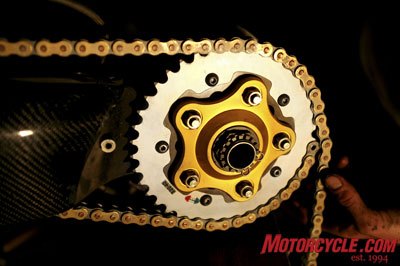
This situation will never do for a racer who needs to adjust gear ratios trackside. The solution is a quick-change carrier that consists of a machined inner sprocket that stays permanently mounted inside the hub to which an outer toothed sprocket is mounted. No need for hub disassembly. Not only are rear sprocket changes quicker, you can afford to have a pile of $70 replacement sprockets with variable gearing versus one of the $250-a-piece OEM Ducati sprockets. We replaced the original sprocket with a quick change set-up from Fast by Ferracci and then swapped the stock hub cover with an anodized unit from Mad Duc.
Take a break. Collect your thoughts. Take a look at your own bike and plan your modifications carefully. Ahead is the final build article, where we put the finishing touches on our Ducati Supersport racer.
| Building a Supersport Spec Racebike Budget - Stage II | |
| Protection | |
| Frame Sliders | $75 - $150 |
| Bar-End Sliders | $15 - $25 |
| Front Axle Sliders | $45 - $150 |
| Rear Swingarm Sliders | $30 |
| Frame Sliders | $75 - $150 |
| Case Guards | $85 - $300 |
| Engine/Exhaust/Intake Modifications | |
| Aftermarket Air Filter | $50 to $250 |
| Spark Plugs | $5 to $25 (each) |
| Exhaust | $500 to $1,000 (slip-on), $1,000 to $2,500 (full system) |
| EPROM (where applicable) | $50 to $150 |
| Power Commander | $350 |
| Professional Mapping | $50 to $150 |
| Transmission/Clutch | |
| Dynojet Quick Shifter | $250 |
| Slipper Clutch | $750 to $2,000 |
| Factory Pro Shift Kit | $75 to $125 |
| Aftermarket Clutch Plates | $100 to $150 |
| Aftermarket Clutch Springs | $20 to $50 |
| Radial Clutch Master Cylinder | $365 |
| Driveline | |
| Chain | $90 to $200 |
| Front Sprocket | $25 to $40 |
| Rear Sprocket | $50 to $75 |
* See the final build article for estimates on total build costs.
Web Links
Speedy Moto crash protection
Yuasa batteries
Martin Brickwood Performance hardened Ducati valve collets
Mad Duc air filters
Fast by Ferracci Ducati performance parts
Power Commander fuel management
Dynojet Quick Shifter
STM slipper clutches
Factory Pro shift kits
Brembo radial clutch master cylinders
Regina chains
Related Reading
Road Racing Series - Part 1
Road Racing Series - Part 2
Road Racing Series - Part 3
Road Racing Series - Part 4
Road Racing Series - Part 5
Road Racing Series - Part 6
Road Racing Series - Part 8
Road Racing Series - Part 9
Road Racing Series - Part 10
Road Racing Series - Part 11
More by Jeremiah Knupp


Comments
Join the conversation