


Road Racing Series - Part 6
The Priorities
With a stripped down bike in the garage and a few bucks in your pocket, it’s time to start building your first race bike. Now that you know the minimum it takes to race your motorcycle, here are the three areas where you should spend your money first.
1. Tires Supersport racers must run D.O.T. legal tires, but this doesn't mean that they have to run "street" tires. Most manufacturers have a high-performance street tire and a "street legal" road-race tire. You've probably eyed them in a parts catalog, wondering if it was worth the extra $100 to put a set of Pirelli Super Corsa Pros on your street bike, rather than the plain old Diablo Sports.
Don't let the D.O.T. tag fool you. Just because these tires are street legal doesn't make them the best choice for the street. Treaded race tires are just that. They take longer to warm up (maybe never up to temperature on your stop-and-go ride to work) and they often lack the compounds that let them survive the heat cycles of day-to-day riding and exposure to the sun. Not to mention that their ultra soft tread won't give you many road miles before they're ready to be replaced.
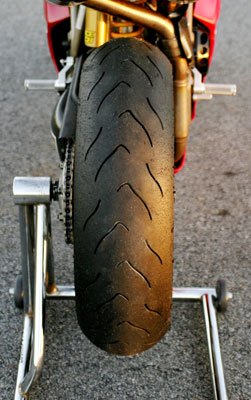
But you're building a race bike, so now is your chance. In the Supersport classes you can't use racing slicks. Spend the extra cash and get those D.O.T.-legal race tires. For our build, Metzeler provided us with a few fresh sets of their Racetecs. We mounted them on the Ducati's stock three-spoke Brembo wheels.
2. Suspension
The suspension on a factory motorcycle, like every other component, is based on a series of compromises. The first is price versus quality. For the manufacturer, cutting a few hundred bucks off the sticker price of a new motorcycle can mean several thousand extra units moving out of the dealers’ doors.
The second is trying to tune the suspension for the "average" rider in the "average" riding situation. How heavy is the average rider? What type of riding will they typically do? Will they be hauling a passenger? The result is a suspension that does everything okay but nothing well. Stickier tires, along with harder braking and acceleration that you will experience on the race track, will further tax your factory springing.
Suspension on a race bike has a singular purpose, to keep your tires in contact with the pavement, and is tuned for a specific rider. The better your tires stay connected to the track, the better you brake, the harder you corner and the faster you accelerate. "Good suspension is the easiest way to go fast," Donnie Unger said. "Suspension is the most important part of a Supersport racer. It's the first place you want to spend your money."
The following is not "Every Last Detail and Secret to Set-Up, Use and Adjust Suspension Like a Pro." Remember this series about becoming a novice racer is being written by a novice racer. I, like you, am learning this as I go. I asked the experts, took their advice and am still trying to comprehend what they told me and apply it in some practical way on the track.
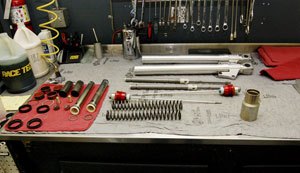
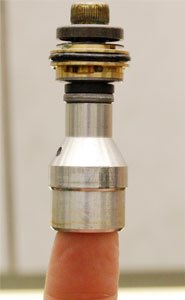
That said…by CCS Supersport regulations the stock fork body must be used, but its internals can be modified. For modern cartridge forks this means replacing the stock springs and re-valving.
The spring in a motorcycle's suspension is the part that supports the suspension under a rider’s weight. From the factory, most bikes are sprung to handle the weight of two-up riding. This makes the average bike's spring too "stiff" for a solo racer (and no, race bike suspension is not supposed to be stiff). Most suspension companies have a formula that calculates the spring "rate" (the amount of force it takes to compress the spring) based on the type of machine you're running and an individual rider's weight.
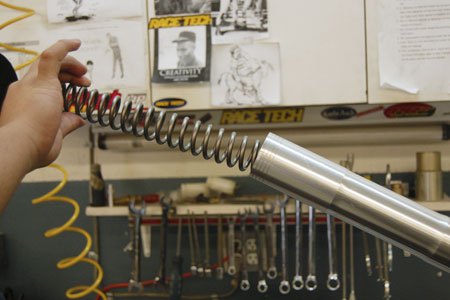
Valving. It's those little screws on your forks and shock that you know you should be turning, but you don't know how. The valving of suspension breaks down into two areas. Compression damping is the force that helps resist using up a suspension’s travel. Rebound damping controls the rate the suspension rises back up through its travel. Re-valving puts a suspension's range of adjustability within what is needed on the track.
For motorcycles that use the older-style damper rod forks, like the SV650, Corona, CA-based Race Tech provides a solution in the form of a "cartridge emulator." The emulator is an adjustable valve that sits between the damper rod and the fork springs and allows for tuning of the fork’s damping qualities on an otherwise un-tunable piece.
The stock rear shock can be usable, but it’s sometimes best to just pony up for a quality aftermarket from a company like Ohlins or Penske. We found a used Ohlins DU143 that came off a Ducati 996. Whether the shock is new or used, it still needs to be modified to match your weight. Again, aftermarket springs and re-valving is in order.
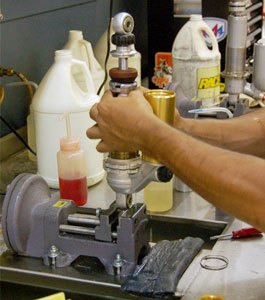
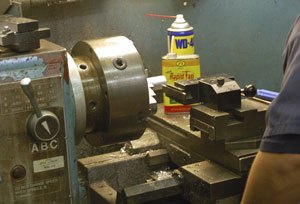
When it comes to rebuilding suspension for road racing motorcycles, the top choice is Race Tech. The company is unique in the fact that it doesn’t only rebuild suspension at its California facility, it sells the same components to garage mechanics who want to save a buck and rebuild the suspension themselves (take a look at the accompanying photo gallery for all the photos from the Race Tech re-build).
Race Tech offered to rebuild both our Showa forks and the Ohlins shock with its components ("We like to make sure that our components are properly assembled and set up," company President Eric Hilton told me.). We were down to the wire and running out of time, so we took Race Tech up on its offer. While rebuilding both is within the means of the average garage mechanic, specialized tools and jigs designed to slowly release spring pressure may be required.
For instructions on setting up your newly tuned suspension, you'll have to wait for our final article.
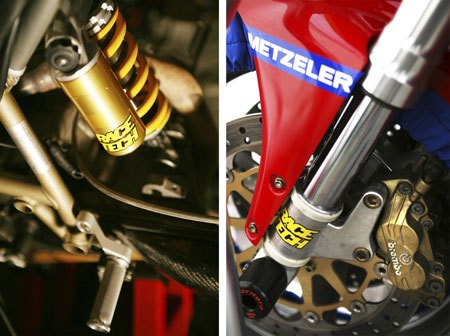
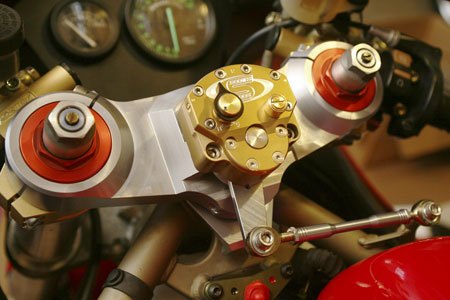
A related component is a steering damper. As speed increases, there is an increase in the chance of front end wobble (caused by track surface irregularities or landing an airborne front wheel). To compensate, most modern sportbikes come from the factory with some type of damping unit that slows the hit that can send your front wobbling. While the quality of these units varies, they rarely have the range of adjustability required on the race track. The unit that came on the Ducati was a non-adjustable "telescopic" design and so it was replaced.
Scotts Performance Products provided us with one of its rotary dampers. As Scotts' website advertises, your forks handle the vertical movement of your motorcycle's front end, while a steering damper controls the horizontal movement. Proven in both on and off-road racing circles, the Scotts damper has three independent valving circuits and can be adjusted across an infinite range “on-the-fly.” Its industry-exclusive adjustable high-speed damping circuit allows for very light feel at slow speeds, while still having the safety of high-speed damping. And like the rest of your suspension, it is completely re-buildable and serviceable.
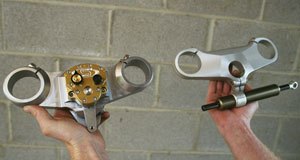
The mounting position of the Scotts unit required changing the top half of the stock triple clamp for a billet aluminum version made by Scotts. Besides looking beautiful, the Scotts clamp also had a wider clamping area, helping to prevent front-end flex. The damper then mounted in the center of the new triple clamp and attached to the same frame mounting point as the OEM unit.
3. Brakes
Being able to slow down quickly and predictably is one of the keys to smooth cornering and quick lap times. Supersport regulations require that a machine’s stock calipers must be used, meaning the cornerstone of a motorcycle's braking system must be retained. But without changing the calipers there is still plenty of room for improvement.
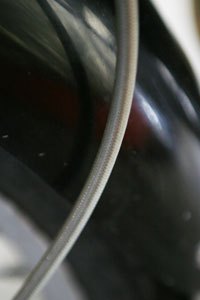
The three weak spots on most motorcycles’ braking systems are the brake pads, the brake lines and the brake fluid. Most sportbike riders have overtaxed their stock rubber brake lines pushing it hard on a summer day and have experienced brake fade and that mushy vagueness of the lever that gives the impression that you're not going to stop and destroys your braking confidence. Switching to stainless steel or Kevlar lines is a quick and affordable way to correct this problem. While you're swapping lines, replace your brake fluid with a high quality "race" grade DOT 4 or 5 fluid with a high boiling point.
The difference between street brake pads and race brake pads are like the difference between street and race tires. Race pads may take longer to heat up and you may never get them up to their optimal working temperature on your way to your local biker bar. But on the track they heat up quick, stay hot and bite like nothing else you've ever braked with. Like tires, now is the time to drop the extra cash and buy the best you can afford. On the street, I've had good experience with EBC pads, a set always transforming the performance of a stock braking system, so we used them on our race Ducati.
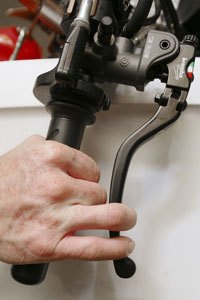
The 748 came from the factory blessed with a good brake system courtesy of Brembo, complemented by OEM stainless steel lines. While calipers must remain stock, Supersport rules allow you to change your master cylinder. The front brake master cylinder is one place a Supersport racer can upgrade to being on the verge of MotoGP technology.
Most older sport bikes and newer "entry level" machines use a conventional "axial mount" front brake master cylinder. A radial master cylinder is the upgrade of choice. A "radial" master cylinder design simply means that the brake lever and master cylinder plunger move in the same direction, versus the two pieces moving perpendicular to each other as they do in a conventional "axial" mounted master cylinder.
A radial master cylinder allows for more consistent feel and less lever throw, which allows you to position the lever closer to the clip-on and better squeeze it with your entire hand. If you're a two-finger braker you can start using your outside two fingers near the end of the lever where they will apply the most force, versus using your inside two fingers closer to the master cylinder.
Many top end sport bikes come from the factory with some sort of radial master cylinder. The budget way to go to a radial master cylinder is to find a used OEM take off and adapt it to your braking system. A true upgrade means moving to an aftermarket unit.

For our build Brembo supplied us with their 19 RCS master cylinder. If your motorcycle already has a radial master cylinder there are plenty of reasons to upgrade to the Brembo unit. First, it features a folding lever that is designed to prevent damage to both the lever and the master cylinder in the case of a crash, and the lever is adjustable "on the fly."
Second, the distance between the lever pivot point and the plunger is adjustable between 18 and 20mm with Brembo's "Ratio Click System." By increasing this distance you are getting a more powerful and very sensitive brake. Decreasing it gives more "feel," but also more lever travel. This distance is adjustable on front of the lever. (Brembo also makes models that are either 18 or 20mm only).
Modifications to the hydraulics part of your motorcycle's braking system should be well planned out before you start changing and substituting. Using different master cylinders or changing the type or location of your clip-ons might mean that you need longer or shorter brake lines. The Brembo items we used aren't direct "bolt-on" for most motorcycles and often require a banjo bolt of a different thread pitch. Be sure to have new copper crush washers of the appropriate size to use on the banjo bolts. Think through your braking changes, measure and figure out what you need and then modifying your brakes can be a quick, clean and easy project.
The 19 RCS master cylinder doesn't come with fluid reservoirs or have a provision for mounting them. We re-used the OEM reservoirs, but had to cut new lines to make them fit. The Speedy Moto adjustable clip-ons have a provision for mounting the reservoir, which we did using the original brackets. Brembo offers reservoirs and brackets for their radial master cylinders, but these must be purchased separately.
Whether you are just changing fluid or upgrading your entire braking system, you'll need to bleed your brake's hydraulic system. Air trapped in your braking system will make your brakes feel spongy, and once the fluid gets hot it will boil away, causing your brakes to fade. Bleeding the system is a difficult-but-doable job for one or an easy job for two.
On your calipers there is a bleed valve that looks like a small bolt with a nipple built into it (they are usually covered with a rubber boot). Attach a length of clear hose to the nipple. Pump the brake lever several times and holding pressure and not releasing the lever on the last pump. While holding the lever, open the valve with a wrench to let the trapped air escape and then re-tighten it. Release the lever and start pumping again. Repeat this process until you don't see air bubbles coming out with the brake fluid. Many performance master cylinders also have their own bleed valve, which you can bleed after the calipers. Bleeding your brakes means you're removing fluid, so keep an eye on your reservoirs and top them up as necessary.
Remember that silicon-based brake fluid absorbs moisture. Moisture turns into gas once the liquid gets hot and you're back to having air in your system. Replace your fluid regularly, minimize the fluid’s exposure to the air and think twice about using that half empty container of fluid that's been sitting around your garage for a year.
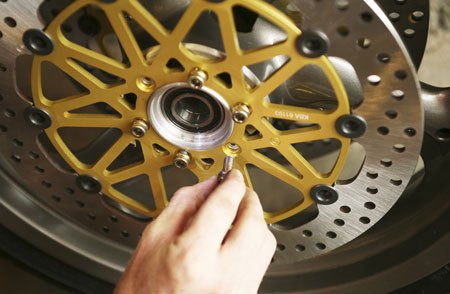
Last on the list of braking system modifications is changing brake rotors. The discs are important not only in improving braking performance, but in reducing un-sprung weight on the front end to improve handling and turn-in. They are the Supersport racer's only opportunity (along with your choice of tires) to reduce weight in this critical area. OEM brake discs are a compromise based on cost, durability and resistance to rusting when exposed to the elements. Racing rotors are designed only to stop you quickly and save weight.
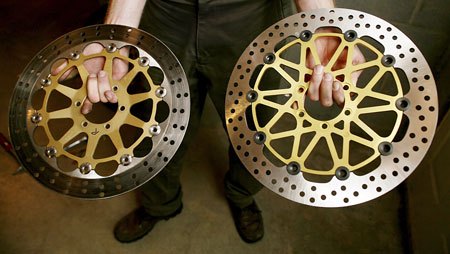
To top off our braking upgrade, Brembo supplied us with a set of their HP ("high performance") rotors. The HP rotors use a fully floating design, which means the outer disc is attached to the center carrier by "buttons" that allow the disc to move independently from its mount. This means when the disc starts to heat up and change shape under race conditions, it can still move to maintain good contact with the brake pads instead of warping and twisting against its mounts on the wheel.
The HP rotors are thicker than the stock rotors, so that they will resist warping and last longer under hard usage. When compared to the OEM discs, the HPs have extra holes drilled in them to save weight and dispel gases created by the friction between the pad and the disc.
Upgrading rotors is the simplest of your brake system modifications. Simply remove your wheels and they bolt on (be sure to apply some locking compound to the bolts and tighten them to the proper torque). Brembo makes bolt-on HP rotor kits for almost all models of sportbikes.
The rear brakes, though less crucial than the front, should get a similar treatment of upgraded pads, rotor, lines and fluid.
Once you've upgraded your brakes you've completed the top priorities when it comes to building a Supersport racer. If you've exhausted your racing budget with the modifications we've described up to this point, don't worry, you've already built a very competent Supersport machine and you're ready to hit the track.
For those who want to (or can afford to), there will be more build articles that will move on to advanced Supersport modifications.
| Building a Supersport Spec Racebike Budget - Stage I | |
| The Motorcycle | |
| Used Motorcycle | $1,000 to ... |
| Tires | |
| DOT Legal Racing Tires (set) | $300 to $600 |
| Suspension/Chassis | |
| Front Forks | Springs: $110 |
| Valves: $180 or $170 (cartridge emulator) | |
| Seals (each): $30 | |
| Professional Installation and rebuild: $150 | |
| Rear Shock | Aftermarket: $500 to $1,500 (new), $150 to $750 (used) |
| Spring: $110 | |
| Seal: $10 | |
| Professional Installation or rebuild: $105 | |
| Steering Damper | Aftermarket: $350 to $750 |
| Brakes | |
| Pads | Front (each): $35 to $85 |
| Rear: $25 to $35 | |
| Brake Fluid | $20 |
| Replacement Lines | Front (each): $100 to $200 |
| Rear: $50 to $100 | |
| Aftermarket Rotors | Front (each): $250 to $500 |
| Rear: $100 to $150 | |
| Aftermarket Master Cylinder | $150 to $250 (used), $250 to $375 (new) |
See the final build article for estimates on total build costs.
Web Links
Championship Cup Series racing
Lockhart Phillips race parts
Donnie Unger and Duc Pond Motorsports
Corse Velocita LLC, Mad Duc Ducati parts
Metzeler tires
EBC brake pads
Race Tech suspension
Scotts Performance steering damper
Brembo brakes
Sharkskinz oil pans
Related Reading
Road Racing Series - Part 1
Road Racing Series - Part 2
Road Racing Series - Part 3
Road Racing Series - Part 4
Road Racing Series - Part 5
Road Racing Series - Part 7
Road Racing Series - Part 8
Road Racing Series - Part 9
Road Racing Series - Part 10
Road Racing Series - Part 11
More by Jeremiah Knupp


Comments
Join the conversation