


Convertibars Adjustable Handlebar Review
Yamaha YZF600R rider and good friend, Josiah Taulbee, says to me that his daily, lane-splitting commute across Los Angeles is exceeding the boundaries of comfort on his defunct but low-mileage supersport. “I just so happen to have a set of Convertibars I was installing on my test mule Superhawk, but you’d be a better candidate for evaluating their effectiveness,” I reply. A weekend later we’re in the garage stripping his YZF of its stock clip-ons.
The Convertibars package included the Universal Kit ($340) with the parts necessary to complete basic installation. New Vibration Killers bar ends were included ($43 bargain) because the original weights bolt directly into an internal sleeve in the stock bars instead of utilizing an expanding rubber mount. The price, including the bar ends, plus shipping brings the total price to approximately $356.

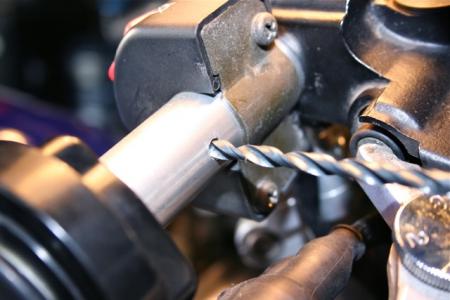
The included directions and installation video are general in their descriptions, but thankfully the installation of new handlebars isn’t overly complicated and can be completed by an unskilled home mechanic. Convertibars claims an average of two hours from start to finish. Our garage time, including documenting the process and running to the store to purchase a pipe cutter, came to approximately 3.5 hours.
Removing handlebar components — levers, switchgear, reservoirs, etc. — and installing the Convertibars isn’t a time consuming process. What requires the most amount of time is adjusting the bars to your personal preference and ensuring proper clearances of bars and components within the range of fork rotation. Before beginning, however, I recommend taking a few snap shots so you have a reference when adjusting the Convertibars, or if you have to reinstall the stock components at a later time.
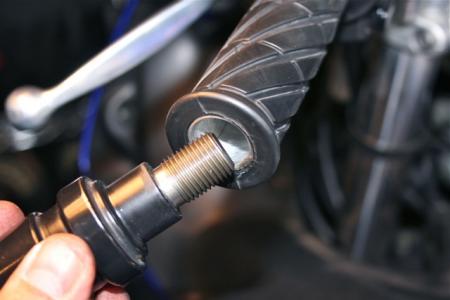
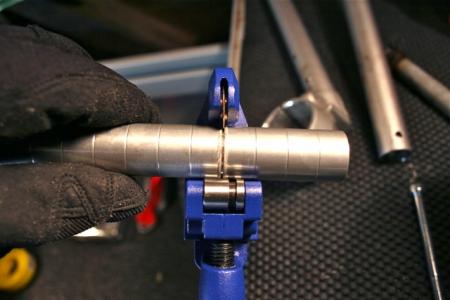
Once the stock clip-ons are stripped of their components and removed from the fork tubes the Convertibars installation process begins with sliding the Cyclops clamps over each fork tube, inserting the risers then reinstalling the switchgear et al. on the new handlebars and torquing all components so they hold their place but can be manipulated easily until final placement is determined. The fun (code for frustration) begins with the process of striking a balance between your preferred setting, fairing and fuel tank clearances, and the length of lines/cables (if you’re using stock lines/cables). “It’s sort of like a Rubik’s Cube,” says Convertibars’ Steve Mager, of the adjustment process, “but once you get it figured out future adjustments are easy.”
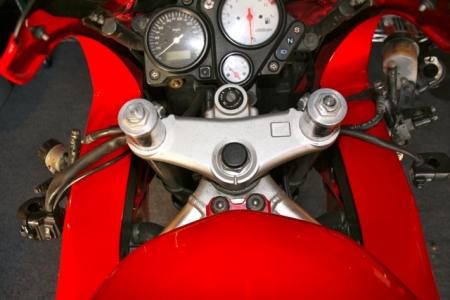
The lowest setting, when mounting the Convertibars above the triple clamp on the YZF, increased handlebar rise approximately 1.5 inches. By cutting zip ties that were bundling cables/lines, and repositioning a front brake line mount we were able to reach an acceptable position that was both comfortable for Josiah and didn’t bind cable/lines or impair steering clearances. Both bars kissed the upper fairing supports at full left and right lock, but were not going to cause damage or impair riding, which was acceptable for both Josiah and Convertibars instructions.
Finding the right arrangement wasn’t easy as it took some finagling and fine tuning, but positioning the Convertibars above the triple clamp is doable. The other option is to place the Cyclops clamps below the triple clamp (which may happen in the future) but the look isn’t as clean and the different location certainly brings its own complications to the process.
With the installation complete it was time for real-world riding impressions. So for the last few weeks Josiah’s been commuting with his new Convertibars. Here’s his insight:
“Overall the bars have been a huge improvement. I ride 44 miles in commuter traffic at speeds between 35-70mph with about 20 of those miles splitting lanes. There is a much greater impact on the strain of what the bars actually helped fix in these riding conditions. My lower back, shoulders and arms are much more relaxed, and there’s no residual pain after riding. It really is day and night in those areas.
“My left wrist is feeling a little sore, but I think this is due to the placement of the clutch lever and not the riding position (for clearance purposes the clutch lever was positioned somewhat high). The increased amount of lift to reach the lever requires my wrist to bend slightly out of shape. On the right, my hand still falls slightly asleep but it doesn’t go all the way up my forearm or bicep. I notice this more when its colder, probably because I am gripping tighter. However, it is way better than before and I typically don't even notice the numbing until I'm almost arriving at work.
“As far as performance, outside of riding position I cannot tell any difference in the way the bike performs. I ran it down a curvy road and I was confident in the bike’s ability. I was still able to hang off the side of the bike with ease and ride it hard.

“The only major complaint I have is the bars feel like they are twisted in a bit too much. I can also tell they are slightly off, the left being out a little more than the right. As much as we tried to set them equal they had to be placed where they were to get the clearance they needed. If I can twist the bars out just a touch it will be perfect. At the moment, a marginal change to make them equal is feasible with a little fairing contact on the right.
“I am sure if I continue to slowly tweak the bars I will get them closer to where I want them. However, where they are now is significantly better than where they were before — that little bit of comfort goes a long way.”
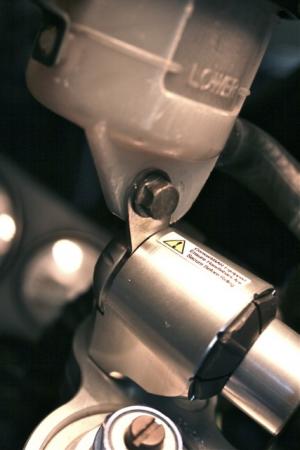
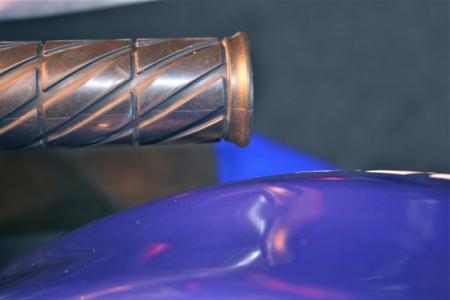
The novel aspect of Convertibars is the collet at the handlebar/riser junction. The beveled design allows for a multitude of positions changing any bike from racer to sport-tourer. Of course, repositioning the collet requires tweaking the positioning of the lever, switchgear, etc., as well as rechecking clearances, but the design is unique to Convertibars.
If you attempt an at-home installation make sure to read all the directions, including the notes section and go online to read model-specific instructions, to avoid mistakes and make the process as trouble-free as possible. If you’re not confident doing self-installation, contact an authorized dealer and have it done there. Convertibars emphasizes that a normal installation should cost no more than two hours labor, however this doesn’t include the possibility of custom lines/cables or the labor involved installing and routing these components, or bleeding the front brake line.
Related Reading
Shorai LFX Lithium Battery Review
Heated Grips Evaluation
More by Tom Roderick


Comments
Join the conversation