


MO Touring: Building A Lightweight Adventure Tourer - Part 2
Wind protection, navigation, and creature comfort: refining the package for the long haul

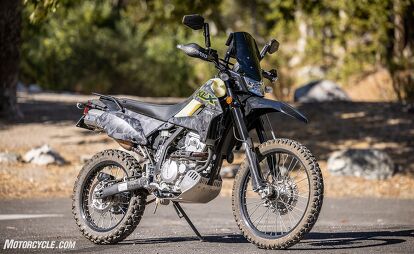


If you read MO Touring: Building A Lightweight Adventure Tourer – Part 1, you know that I spent the first phase of my build focusing on protection, travel-worthiness, and luggage to transform a dual sport motorcycle into a lightweight adventure tourer. Although largely a success, a couple of short shakedown tours pointed the direction for further upgrades. Consider this the polishing draft of the project, in which I hone down the rough edges before committing to a longer tour.
MO Touring: Building A Lightweight Adventure Tourer – Part 1
Wind Protection
Since I frequently ride a naked bike, I initially scoffed at the idea of putting a windscreen on the KLX. After all, it will rarely top 70 mph, and the wind blast isn’t too intense at that rate. However, after my first extended highway ride on the little 300, I noticed that the fuel economy dropped significantly at 70 mph and above, making me wonder if mounting a windscreen might make the air flow around my body more efficiently and give that little 300cc Single a break.
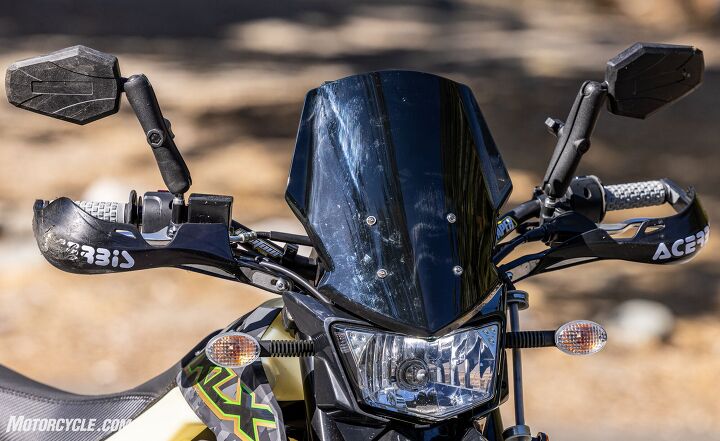
After seeing what I thought was a good looking windshield on a forum, I reached out to the poster to inquire about where he got his. It turns out he saw this setup on a bike when he was on a ride in Central America and was able to get the information from the bike’s owner. It’s amazing how far good ideas can spread. Anyhow, the windshield is designed for a Yamaha MT-07 and can be bought on Amazon for $65. The Lorababer Motorcycle Motorbike Sport MT-07 FZ-07 Windshield shipped directly from its Chinese manufacturer to my home in a couple of weeks.
Installing the windscreen required a little MacGyvering, but it can be done in about 30 minutes. First, the abbreviated stock windscreen needed to be removed from the headlight assembly. Then, the lower windshield mounts need to be bent 90° so that they are as straight as possible. I used a pair of pliers to do the initial bend, and then I cranked it between the jaws of my bench vise to get it straight. Next, I lopped off the upper mounts with a reciprocating saw, making the bracket go in roughly a straight line from the center section. Since this is out of sight when it’s mounted, I didn’t worry too much about making it pretty. Then the lower mounts bolt directly to the KLX where the mini-screen was previously. Finally, the rubber sheet that keeps the headlight from reflecting in the stock mini-screen needs two slits cut to accommodate the windshield brackets, and then, the three pieces can be secured to the back of the screen with hook-and-loop fastener.
Once it was all mounted, the windscreen looked like it was meant to be on the KLX300. Although I haven’t taken the bike on an extended freeway ride with the windscreen, my short blasts on the interstate have me thinking this was a good modification. The engine feels like it is under a little less strain than it did before.
Navigation
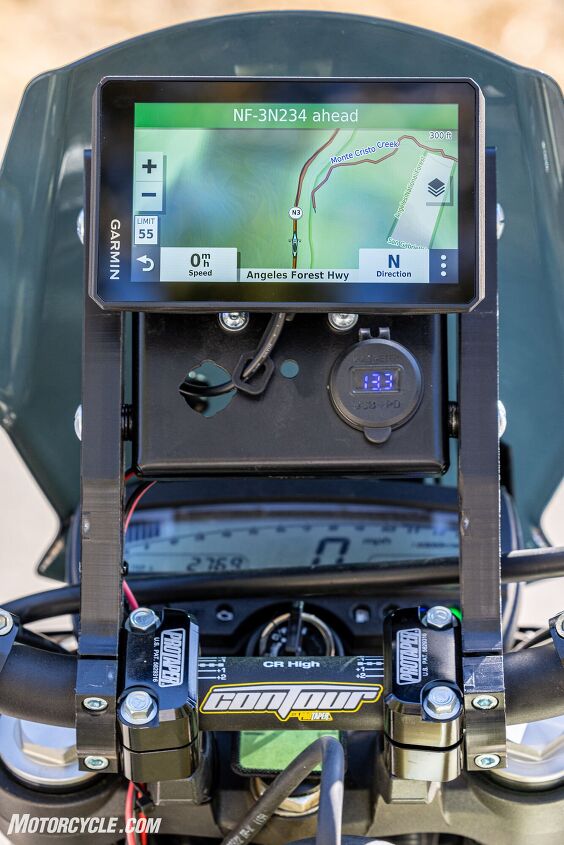
After damaging my iPhone’s camera on my North Carolina/Virginia tour this past spring, I’ve been taking a long, hard look at GPS devices available for motorcycles. While the heavyweight Adventure Tourers may have built-in navigation systems (or a means to attach your cell phone), my little KLX needed something I could count on to get me where I wanted when the cellular service was non-existent. After months of waffling, I decided to go with the Garmin zūmo XT motorcycle GPS ($500).
My reasons were simple: It is a motorcycle-specific model, and it has topographic maps installed from the factory, meaning that once I import the tracks for the California Backcountry Discovery Route, I can follow the route easily. Additionally, it can be paired with one of Garmin’s inReach devices for off-grid tracking, messaging, and SOS services. (Look for a full review of the Garmin zūmo XT in the future, after I’ve logged more miles with it.)
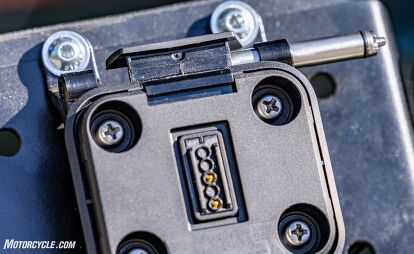
When I selected the zūmo, I had no idea what kind of rabbit hole it would send me down. After so much time using my phone on a handlebar mount, I knew that I wanted to mount the GPS higher, closer to my field of view, so that I didn’t have to look down as far to consult the map. Almost immediately, I stumbled onto the Adventure-Spec Mini Fairing Support ($101), which was designed to mount (via an AMPS-compatible bracket) a GPS unit up high. Although the support could accommodate its own mini-fairing, I already had a windshield I was quite happy with, and I didn’t like the blocky looks of the Adventure-Spec one. Still, the Mini Fairing Support seemed like the hot ticket, and I printed out (and scaled to the proper size) the line drawing of the support from the Adventure-Spec website to make sure it would fit before ordering.

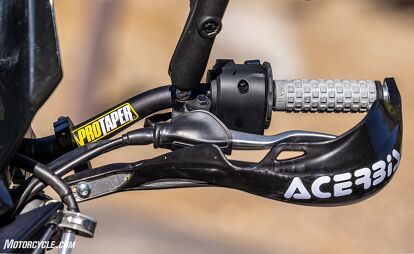
Although the Mini Fairing Support is available in versions to clamp to either 7/8- or 1 1/8-inch bars, I decided to go ahead and upgrade my handlebar to a $71 ProTaper Contour 1 1/8″ Handlebar CR High Bend. (I had been planning on doing this but was waiting until after I bent the stock bar.) Of course, this set off a mini-cascade of other purchases: a ProTaper Universal Solid Handlebar Mount Kit ($42) to convert the 7/8-in. mounts to 1 1/8 in. plus ProTaper Pillow Top Grips ($12) to replace the ones I’d have to cut off the OEM bar to remove the controls.
The Adventure-Spec Mini Fairing Support consists of a stamped steel plate and two beefy plastic arms to support it. Once I had the bar and Mini Fairing Support mounted, the two concerns I had about the product reared their heads. First, the top of the support that is used to mount the Adventure-Spec shield was hitting my windshield. Five minutes with an angle grinder and a quick spritz of semi-gloss black rattle paint later, and the mount fit at the angle I wanted without hitting the windshield. Next, a more difficult problem to remedy had to be considered. Namely, the bottom of the Mini Fairing Support blocked my view of the instrument cluster. Raising the bracket isn’t an option since it would end up hitting the windscreen. Since the zūmo XT has a speedometer on the map screen, I decided to live with it obstructing my view for a while. If that doesn’t work, I’ll try cutting a window in the Mini Fairing Support, and if that still doesn’t solve the problem, I’ll admit defeat and buy a handlebar mount for the GPS. (I’ll update this article if I make any changes.)

Finally, I was concerned that the Garmin zūmo XT is so easy to remove. While it mounts securely, it also can be removed in a second with the simple push of a button, making this expensive device extremely vulnerable at gas and food stops when the bike is momentarily out of sight. After looking around at other pricey and bulky locking systems, I found a simple, clever locking system from MotoPumps. Installing in just minutes, the Garmin zūmo XT Security Lock By MotoPumps is light, easy to use, and is hidden from sight when I’m riding – all for $69. I really appreciate an ingenious solution to a vexing problem.
Creature Comforts
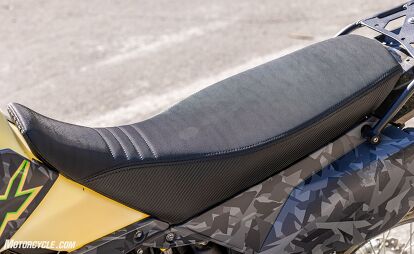
Spending 500 miles over a two-day ride sitting on the stock seat made seeking out a replacement seat a high priority. Since I have several friends who swap out their stock set for a Seat Concepts one on every off-road bike they buy, I decided to see what all of the fuss was about. However, instead of ordering the full seat from Seat Concepts, I decided to minimize the waste I was creating by ordering the company’s $220 Kawasaki (2009-23) KLX250S/SF, KLX300/SM – Comfort Foam & Cover Kit ($325 for the full seat). After popping the first staple into the stock seat base to mount the new cover, I realized that my spring-loaded T-50 staple gun wasn’t going to cut it, so I took the seat to a local auto upholstery shop. Two days and $50 later, I had the new seat on my KLX.
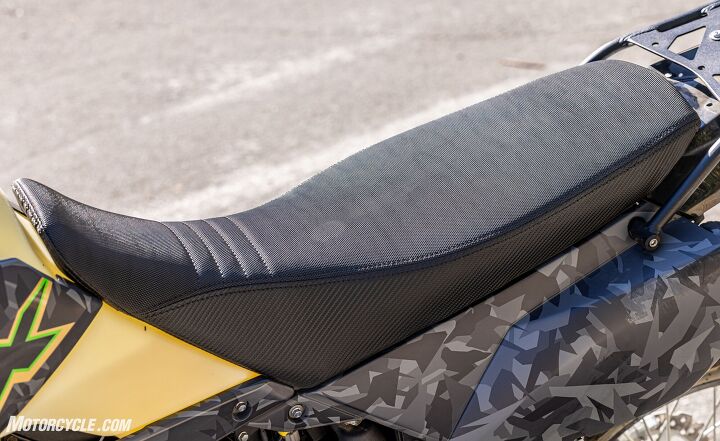
My first impression was that the seat was much firmer than I expected. It wasn’t uncomfortable. I’d just imagined it would be softer. The shape of the seat is such that, at the front by the tank, it maintains the stock narrowness to allow for easy movement while standing, but as you move rearward, the seat widens to give a broader perch for racking up the miles. Once I got out on the road, the wider rear portion of the seat impressed me with how much more comfortable it was, despite the firmness. I could easily move around, and I no longer felt like my butt cheeks were simultaneously on both edges of the seat. After a few rides, the foam has already broken in a little, so I expect it to continue to soften up as I log more miles.
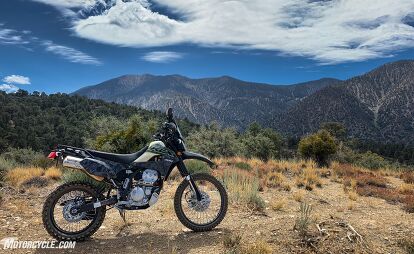
As my Lightweight Adventure Tourer Project nears completion, I can’t think of much else I want to do to get the KLX300 travel ready. I’m not really interested in putting a pipe on it, as I have grown quite fond of the lack of noise as I explore the local fire roads. I suppose I could look into suspension upgrades, but I don’t feel that the stock suspenders are holding me back at this point. (Not to mention that the cost of the components would push this project out of the budget range that I’ve tried to maintain.) So, that leaves tires. However, the Dunlop D605 rubber has served me well so far, and has tons of life left in it. Maybe I’ll mount some upgraded foot controls, but that’s reaching. When I really think about it, what my KLX needs is more miles on the odometer and more scratches on the bodywork. As soon as the late summer heatwave ends, I’m heading to the desert for some solo camping.

We are committed to finding, researching, and recommending the best products. We earn commissions from purchases you make using the retail links in our product reviews. Learn more about how this works.
Become a Motorcycle.com insider. Get the latest motorcycle news first by subscribing to our newsletter here.

Like most of the best happenings in his life, Evans stumbled into his motojournalism career. While on his way to a planned life in academia, he applied for a job at a motorcycle magazine, thinking he’d get the opportunity to write some freelance articles. Instead, he was offered a full-time job in which he discovered he could actually get paid to ride other people’s motorcycles – and he’s never looked back. Over the 25 years he’s been in the motorcycle industry, Evans has written two books, 101 Sportbike Performance Projects and How to Modify Your Metric Cruiser, and has ridden just about every production motorcycle manufactured. Evans has a deep love of motorcycles and believes they are a force for good in the world.
More by Evans Brasfield


Comments
Join the conversation
Seems like a huge waste of money putting all that expensive gps stuff on a 300cc motorcycle.
Really slick mod with the small windscreen. I agree 100%, it looks like it was made for the KLX. Any wind protection one can get on road ridden dirt bikes is a big deal as the rider is basically a human sail, but it has to not be a hindrance while riding on trails. This screen looks to strike the balance of wind protection vs. compactness perfectly.
The Seat Concepts saddle is another critical comfort mod as any narrow dirt bike seat is a weapon of ass destruction on the street. Ya, the Saddle Concepts seat foam is firm, but it works. If this still narrowish saddle was softer it would provide less support and the rider would get "monkey butt" a lot faster on extended street rides. Nothing will turn a KLX 300 into a Gold Wing, the Seat Concepts is best of breed stuff for making the small bike as comfortable as it can be. I suspect the range from the bigger 2.7 gallon IMS tank will match the comfort level provided by the upgraded seat nicely.
Thanks to the dirt bike ergos, one can always stand up for a bit when the butt gets sore - I do this all the time on my big ADV bike, which sees 400 mile days on occasion. Gotta love a real Pro Taper handlebar in place of the probably oddly shaped and too low mild steel stocker too for ergo and cool factor improvement. Nice focused job on the comfort mods for this installment!