


MO Wrenching: How To Replace Brake Pads
Fresh pads for quick, controllable stops


Brakes perform a critical job on a motorcycle, which means you should pay special attention to the condition of your bike’s pads. So, plan on replacing your pads when a minimum of 2mm of the pad material remains. Even with 2mm of pad material left, your braking power could be compromised under heavy braking, like at a trackday or a panic stop. Yes, if you like to gamble, you could run them to the absolute limits of their service, but why roll the dice on such an important safety feature.
Top 10 Winter Maintenance Projects
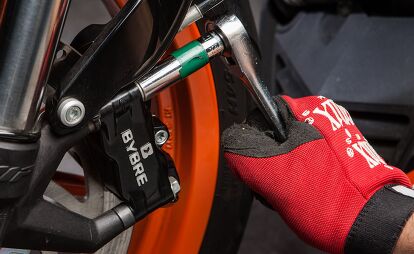
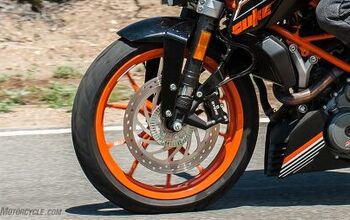
Although we will be focusing on changing front brake pads, the basic steps will be the same for the rear. If you have a rear stand or center stand, begin by placing your bike on it. A front stand makes the process easier. Begin by removing a caliper from its hanger. On single-action calipers (with all the pistons on one side), you may need to pry the pads apart with a large flat head screwdriver before you can slip the pads out. Some calipers secure the pads with a retaining pin and spring clip that you will need to remove first.
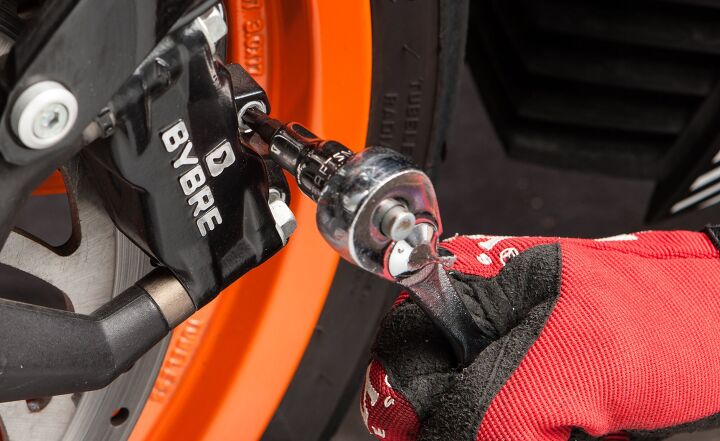
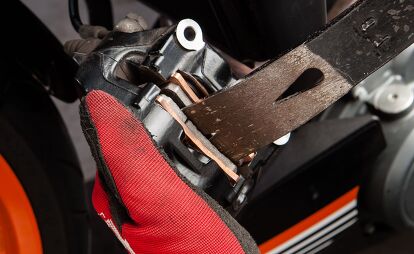
Slip the used pads out, but before you set them aside, inspect them closely. Did they wear evenly? If one pad is thinner than the other, take a look at the pistons to see if they are sticking. Another symptom of a recalcitrant caliper piston is having one end of the pad more worn than the other. These pad symptoms may signal the need for a caliper rebuild.
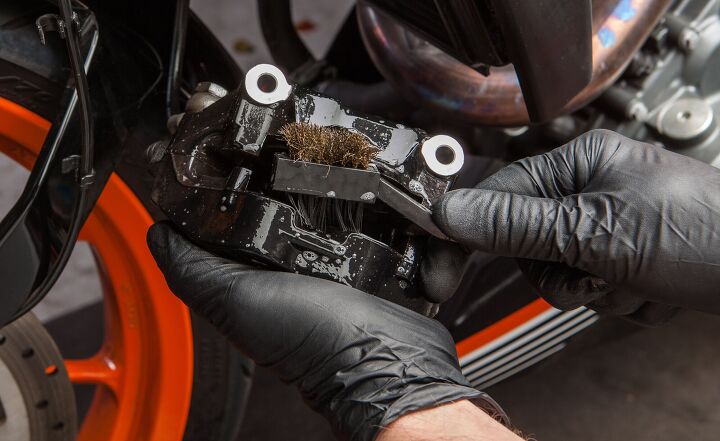
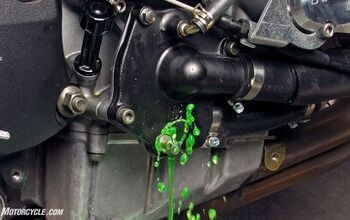
After you have the pads out, you need to clean the caliper components. Cleaning the caliper removes the obvious stuff like brake dust, but it also plays an important role in preventing the need for rebuilds. Most riders are aware that brake fluids absorb moisture out of the air through the piston seals into the closed environment of the hydraulic system. Well, that’s not all that happens. The moisture combines with the brake dust and grit and whatever else happens to be wedged into the calipers, forming a kind of shellac which bonds to the surface of the pistons and keeps them from sliding smoothly against the rubber seals.
Since the goal is to clean the caliper and its pistons, exposing more of the pistons’ surface is a good idea. Don’t be impatient. Just squeeze the brake lever slightly to push the pistons out of their bores. If you squeeze too much, a piston will pop out of the caliper, creating a huge mess. Instead, slip a thin piece of wood in between the pistons to prevent the dreaded “piston pop.” Leave enough room to allow a toothbrush in to clean the pistons.
Use Simple Green or another organic cleaner to cut through the mung and avoid the temptation of contact cleaner. According to the brake manufacturers, petroleum-based cleaners, like contact cleaner, will swell the rubber O-rings that seal the calipers, potentially increasing the stiction in the caliper.
Using the toothbrush and organic cleaner, carefully rub the shellac off the pistons. The side in the top of the caliper is the hardest to reach and may require some dexterity to get to. If you see any signs of brake fluid leaking, go buy the caliper rebuild kit. You should pay attention to the surface of the pistons. If you see rust or pitting, prepare for a rebuild. Once the calipers are clean, blow them dry with compressed air to keep any of the solvents from being forced into the brake fluid as you slide the pistons back into the caliper.
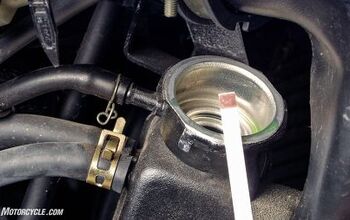
While the pistons are extended out for cleaning, you won’t be able to install the new brake pads. Press the pistons back into the caliper one or two at a time. Hold the other pistons while you do so to keep them from popping out. If the pistons refuse to press fully into their bores, check the master cylinder’s reservoir. Since the fluid in the caliper is displaced back into the reservoir, fluid that was added as the level dropped in the reservoir may hydraulically lock the system if it completely fills the reservoir. Siphon some fluid out and continue pressing the caliper pistons into place.
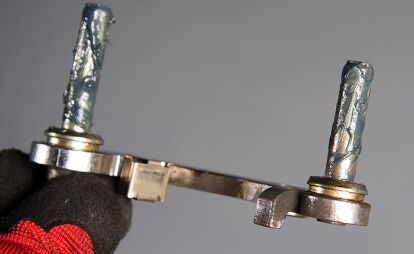
On single-action calipers, (which you remember only have piston(s) on one side), you want to pull back the rubber boots protecting the pins and slide them free of the caliper. Using the same organic cleaners, remove the old grease and check for any notches or unseemly wear to the pins. Lube the clean pins with waterproof, high-temperature grease and slide them into position under their protective covers.

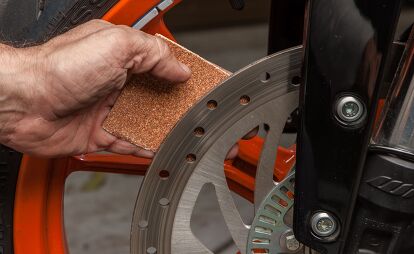
Since brake pads leave traces of material on the disc, you need to prepare the surface for new pads. If you’re changing pad compounds, removing this material is vital if you want the new pads to bed in properly. However, you still want to remove any build up of pad material on the disc face, using a piece of 60- or 80-grit sandpaper, even if you’re replacing the old pads with ones of the same compound. With your bike on a front stand, simply press the sandpaper against the swept surface and spin the wheel a few times. Repeat the process on the other side of the disc. You’re not trying to score the disk, just remove the build-up. Finish the disc prep by spraying it with brake cleaner and wiping it with a clean rag.
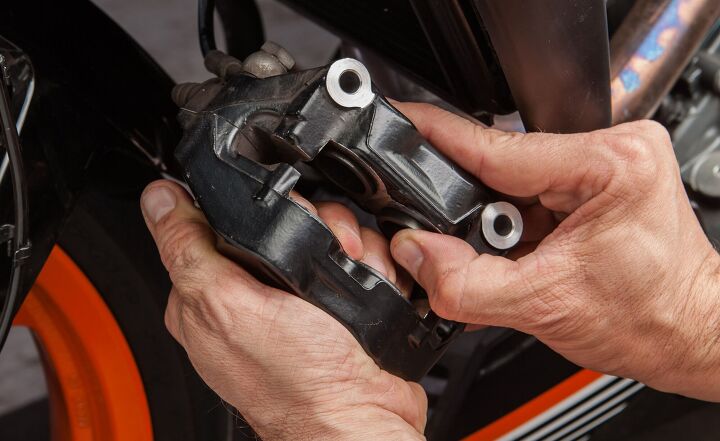
Now, you can replace the pads. Pay special attention to placing the factory anti-squeal plates or springs in the proper position. Check another caliper if you can’t remember how the pieces go together. If the pads are not held in place with a pin, pay special attention to the way they fit in the caliper and verify that they haven’t shifted once you’ve remounted the caliper to its bracket. Don’t forget to torque the fasteners to the proper specification. Also, pump up the brake lever to have the caliper press the new pads against the disc.

After you’ve mounted all your new pads, you need to break them in to receive the maximum stopping power they have to offer. The surfaces of both the pads and the discs aren’t really as smooth as they look. In fact, they’re made up of lots of hills and valleys, looking like a saw blade, up close. The break-in procedure wears down the pad so that the hills and valleys match each other, giving the maximum surface-area contact. Get too aggressive too soon, and the hills melt and glaze over, lowering the coefficient of friction for the pads and reducing braking performance.

Begin pad break-in by riding in a parking lot and lightly applying the brake, bringing the bike slowly to a stop. Do this a few times with slightly more pressure each time. Now, go for a ride. Just like when you have new tires and know not to immediately throw your bike into corners, allow yourself some extra room for braking around town. Begin to vary your braking pressure. One stop, be more firm than the next. Allow for some cooling between applications. If you’re in the twisties, give the pads a couple corners’ rest before using them hard again.
There is no magic number for how long it takes to break- in a set of pads. If you vary the pressure and don’t build it up too quickly, a short ride may be enough. However, if you’re ever in doubt about how to break- in a set of pads, simply look at the instructions that came with them. You will be fine just following them – the manufacturers know.
[This article was adapted from Evans Brasfield’s book 101 Sportbike Performance Projects. Learn more about it here. Read the MO review here.]

Like most of the best happenings in his life, Evans stumbled into his motojournalism career. While on his way to a planned life in academia, he applied for a job at a motorcycle magazine, thinking he’d get the opportunity to write some freelance articles. Instead, he was offered a full-time job in which he discovered he could actually get paid to ride other people’s motorcycles – and he’s never looked back. Over the 25 years he’s been in the motorcycle industry, Evans has written two books, 101 Sportbike Performance Projects and How to Modify Your Metric Cruiser, and has ridden just about every production motorcycle manufactured. Evans has a deep love of motorcycles and believes they are a force for good in the world.
More by Evans Brasfield


Comments
Join the conversation
Boy have I been doing it wrong. On my bike I can swap the pads without removing the calipers. Same thing front and rear, I just pop the old ones out and the new ones in. I wonder if I'm about to kill myself. Well, only one way to find out. In the mean time, thanks for the good advice, Evans.
Wow, that is a maximum amount of care you can give to your brakes. But only 5% of motorcyclists do that. And even they don't do it every time. And rightly so. It would take a few hours, which means a few hours less riding time.