


Life Compared to an SV650
Stage 1: Race Tech Front End Upgrade
Torrance, California, August 16, 2002 -- The time had come for some serious work to be done on my trusty 2000 Suzuki SV650; it had survived two Seattle winters and traveled more than 16000 miles, looking great but in need of some mechanical luvin'. I was past due on the 15000-mile service, it was desperately in need of some new sprockets and a chain, the exhaust needed repacking, the forks felt like they were filled with Jell-O, and the shock absorber was no longer absorbing shocks.
I've done all of the maintenance work on my SV to date so I decided to keep up the tradition. I was tempted to take it to a dealer to perform the 15000-mile service, but I forged onward, and according to my feeler gauge, a brief moment of panic passed when my initial measurements had the front cylinder's valves looser than specified. The culprit turned out to be human error; all eight valves were still in spec. Eeexcellent.
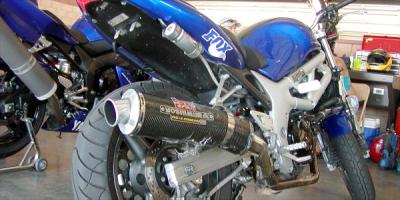
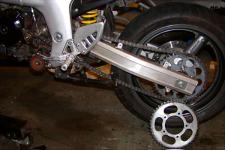
The old 525 chain had fused into foot-long chunks of rust and fossilized chain lube; it was promptly thrown in the MO dumpster in favor of a Tsubaki 520 roller chain that was left over from the Buell race team and a 520-sprocket conversion kit by AFAM that cost $104. The AFAM parts consist of a steel countershaft sprocket and an alloy rear sprocket. The alloy is almost as light as aluminum but is supposed to have the life of steel with proper maintenance. I repacked the Yoshimura race exhaust can with Silent Sport exhaust packing, which at close to $16 was neither a bargain nor a good performer. It didn't reduce the overall volume of the exhaust note very much or make the pleasant sounds that such a system should. I was more pleased with $3 worth of marine-grade fiberglass from a boating supply store that I used for my previous repacking endeavor. With those mundane details out of the way, I moved on to the modification that I had been saving to do as a finale.
The Race Tech upgrade was actually the easiest, least frustrating, and most rewarding work that I've ever done on my bike.
The only other suspension work I had done to my bike in nearly two years of ownership was to swap the stock 5W fork oil that looked like bilge water with fresh Bel Ray 15W synthetic fork oil. This turned out to be a temporary remedy to larger problems, as my fork seals were shot and the fluid was soon contaminated with Seattle winter goo and grit.
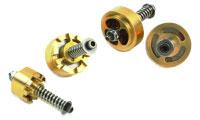
After that, you simply drill out the stock damping holes in the damping rods, add two extra holes, and cut some new preload spacers from the length of pipe supplied just for this purpose by Race Tech. The enlarged and new holes effectively bypass the damping rod and allow the Gold Valves to do their thing, happily emulating a cartridge fork. Using a drill press to do this helped immensely, though I'm sure I could have done it with a hand drill, albeit a bit more cautiously. Calculating the length and cutting the new spacers compensates for the length of the valves and maintains the proper preload on the front suspension.
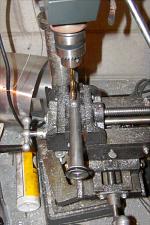
There's nothing particularly difficult about the entire upgrade. In fact, the entire process is logically laid out in Race Tech's instruction booklet and is quite intuitive to anyone with a modicum of mechanical aptitude-- and I am no Al Ludington by any stretch of the imagination. Even though doing my own work on my machines can be frustrating and tedious, it's always incredibly rewarding and a great learning process. The Race Tech upgrade was particularly rewarding as I could directly feel the results of my work and it made my SV a much more enjoyable ride because of it.
Silent Sport Exhaust Packing- $15.95
AFAM 520 Sprocket Conversion kit- $104
Race Tech Gold Valve Emulators and Springs- $261.96
Stage 2: Race Tech + Fox Racing Shock, a Trackday, and Getting T-Boned by a High-Velocity R1.
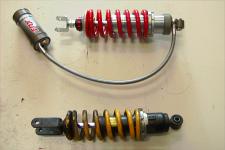
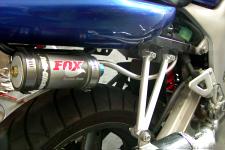
Ahhhh, the joys of motojournalism. A lovely Fox Twin Clicker Shock arrived the day after I completed all the other work on the SV. The Race Tech front end upgrade was fantastic, but pointed out the shortcomings of a stock shock that's endured 16000+ miles of hard use. As one of my friends pointed out, not everyone has the same proclivity towards jumping, off-roading and wheelying their SV650s as I do. (My bike is a true 'do-everything' bike- from dirt bike to long-range sport tourer, it's done it all.)
Well, it wasn't difficult, but there are always a few minor details that conspire along the way to prolong a project. It boils down to a basic formula for me: take the estimated time of completion and multiply by a factor of 1.5-2.
Even with regular bathing, the shock managed to shield itself from soap and water after all these years and was coated with a nice layer of what can best be described as crap.
Removing the stock shock was easy enough. I lifted the rear of the bike to the point where the rear wheel was just about to leave the ground, unbolted the shock mounting bolts and linkages, removed the linkage and dropped the rear to allow the shock to drop free. It was not a pretty sight. Even with regular bathing, the shock managed to shield itself from soap and water after all these years and was coated with a nice layer of what can best be described as crap. If I dug through the layers with the patience, persistence and tools of an archaeologist, I could have probably relived the memories of rides of the distant past. "Oh, I remember THAT dry creek bed!" "Oooh, that was a nice patch of fresh tar..."
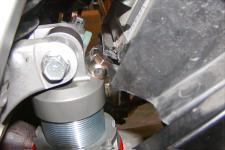
The next setback was the fact that the lower mounting bolt bolted directly into the stock shock and I would need an appropriate nut to hold the new shock in place. Even though these minor things seem insignificant, they all add up. (Tracking down a 10mm nut with 1.25 threads on a Sunday afternoon is more difficult than one would expect in the commerce and consumer oriented city of LA.) In any case, parts in hand, I returned to the final stages of the project.
I adjusted the length of the shock to approximately the same length as the stock shock (a good starting place for tuning) and worked on mounting the new shock and connecting all the linkages together. This was one of the trickier parts of the endeavor, as it required the bike to be raised or lowered to different heights to line everything up properly. It's probably one of those things that is very straightforward and simple if you know the tricks of the trade, but me being me, took my time and with some patience I got it all back together again.
Bright and early Monday morning found me pointing the lovely MO van eastward towards Fontana with my SV and a Ducati Monster S4 in the back. This was to be my second trackday, both of which were at Fontana. The first one was run on the large AMA track that incorporates the speedway oval as the front straight. The shorter, tighter infield track would be the perfect place to test the modified SV and even compare it against its bigger, more powerful and much more expensive brethren in the naked bike arena. I was even more excited this time around than my first track day as it would be an opportunity to gain confidence and build my skills without the stress of being on a $10000+ loaner bike.
Off the bat, I couldn't believe how well the bike handled! It felt fantastically responsive and very tiny underneath me; perhaps it was the removal of the bar-end mirrors that contributed to this sensation, but it felt very light and willing to do exactly what I told it to do. During my first trackday I was the one being passed almost constantly, but this time around I had the confidence to up my pace and get around some of the larger sportbikes lumbering down the short straight sections.
I got a couple of good laps in during the first session and was curious to see what sort of lap times I could pull out in the second session. The only decent time that I got in was 1:35.15 and it didn't feel like a good lap at all. I kept experimenting with different lines and braking techniques and found myself coming into a tricky right-left corner all wrong, so I slowed down through the right-hander and halfway to the left hander, BAM! A very aggressive rider on a very fast 2002 R1 had come into the corner way too hot and slammed into me, sending the bike and I flying and into a nasty wobble. He lowsided but somehow, someway, I managed to stay upright and did not fall over. In retrospect, I don't know how this is possible. The entire situation could have been a lot worse; all that was hurt on my bike was the Yoshimura can was bent with the carbon fiber sleeve shattered. Luckily, it and not my right leg absorbed most of the impact energy from Senor Squido and his R1.
But don't let this anecdote dissuade you from a track day. In spite of all of Fastrack's pleadings for people not to ride over their head-especially in the beginner's groups-there will always be the occasional moron. He was banned for the rest of the day, and Fastrack is even helping me track him down for an insurance claim on my pipe.
The limiting factor on my SV650 is no longer the suspension. The stock parts were decent but definitely began to show their age after miles and miles of hard use. Now it is down to fine tuning the suspension setup, tire choice, some brake work and possible upgrades, and what will be the constantly limiting factor: me.
Fox Shock - $629
More by Elliot Strong


Comments
Join the conversation