


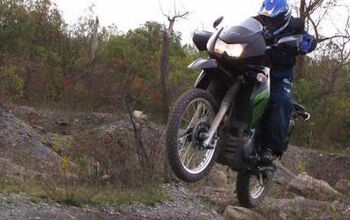
Kawasaki KLR650 Project Bike: Part 4
Like we haven’t all heard that before… Last month we tackled the first two products we received from Happy Trails for our Project KLR, preparing to attack the world with just these two wheels.
By now you’re probably familiar with the Happy-Trail.com website and how easy it is to shop by make and model. How cool is that? Who needs to sort through bar risers for a bike you don’t own? No one does.
Now that you’re ready to pack her up, let's keep her running. The KLR’s infamous reliability, durability and ease of field repair has one big Achilles heel hanging off the right side in the form of a radiator. If you go down, you might be stuck there a while. Consider protecting your bike with some engine guards.
The Happy Trails crash, or nerf, bars were the second most visible piece of equipment I acquired - and perhaps the most valuable. Basically, nerf bars are frame-mounted crash guards to protect not only your bike's bodywork, but more importantly, the bike's radiator and oil cooler in the case of the KLR. Arguably one of the more important systems you don’t want damaged on the trail. Happy Trails makes nerf bars for dozens of bikes on the market; dig around the catalog for your bike’s kit or shop smart and head straight to the KLR section like I do.
There’s obvious debate about the weight savings versus actual need when it comes to crash bars and sliders (for sportbikes). I can understand the differing opinions when considering a centerstand, but if weight savings means staying ahead of the peloton, centerstands are not an option. But since I’m planning to carry multiple weeks of gear including the kitchen sink, I’ll happily side with safety and protection over weight savings. Low-speed tip-overs often aren’t very damaging, but crashes at speed are just as likely when loaded down.
Where the pannier and rack installation you read about in Part 3 spared you knuckle-banging grief, the PD [Paris-Dakar) nerf bar (MSRP $269) installation will try your patience as the included instructions diverge from the norm and get a little cryptic. For the most part, you can mount the kit by yourself, but you're gonna need a friend when you get to the support arm that crosses through the heart of the bike. This is unless you have a third arm that can reach up over the saddle.
The included instructions for the parts ( duplicated in our gallery) are big and simple, and that’s common for most of the instruction sheets we’d seen from Happy Trails. No confusing language or sentence structure – no ‘Fonzie speak,’ as Pete calls it. Just a few photographs of the item, near or next to the bike, a hardware list, a matching location number corresponding to the photograph and some simple directions. The nerf bar install is a little different but makes a lot of sense after you’re done, so I suggest studying the drawing beforehand. I know, who reads the instructions, right? But take a minute and study the three dimensions, then lay out the black power-coated 5/8-inch tubular steel parts beneath the bike, preferably up on a bike stand for less strain on the back and knees, but it’s not necessary.
We performed our install a little differently from the instructions provided by HT, and we survived. If you’re having trouble this way, try theirs; see the image gallery for a jpg of instructions.
First, after removing the front fender for easier access, we mounted the high front crossbar using the two-piece billet clamp ( see photo) running across the outside of the radiator, so as to hang the rest of the guard from that point. Second came the lower crossbar (the one with the footpegs on it) mounted to the bike’s frame downtube using the mounting points of the stock skid plate/motor mount. From this point, with the stock skid plate and motor mounts no longer usable, put ‘em on eBay. The PD Nerf bar and stock skid plate are incompatible. The HT replacement skid plate is, of course, compatible and uses its own brackets as you will see shortly.
Loosely fitting each nut and bolt, saving some wiggle room, the next step is where it helps to have another pair of hands and eyeballs on the opposite side of the bike. Both to see where one half of the crossing member meets the other within the bulk of the bike, as well as helping to hold the other half of the guard up in place. Take note that each cross member is shaped differently and only fits the bike one way.
Pass the left and right halves of flat crossover stamped steel through the bike, both in front of the cylinder head and behind the radiator and plastic shroud. See instruction sheet for specific right and left notations.
It’s a good idea to back out each fastener slightly to inject some Loctite – but don’t completely remove the set or you might lose a few steps of progress when the tension releases. Once you get it all in place, then you can tighten each nut and bolt set around the guard.
Included in the full PD Nerf package is the highway bar and pegs, but they can also be purchased separately for $89. However, as you see with the full kit, you’ll have to replace the stock skid plate due to mounting procedures on the 2008 and newer model KLR.
Available only in black power-coated 5/8-inch tubular steel, the highway bar and PD nerf bar combination are the way to go. With one complete installation and instruction set, you’ll not only gain engine security but also rider comfort with more places to put your feet on those long highway slogs.
While you’re down there…
Because sometimes you need to climb up a curb or over a fallen tree with your motorcycle, Happy Trails offers a 5/32-inch aircraft quality 5052-H-32 aluminum skid plate that replaces the stock plastic skid plate and installs in mere minutes, and costs $107.95. Frugal riders will save money when buying the Nerf bar and skid plate together for $299.
Installation is simple. It ships with very few parts: a plastic spacer and U-bolt to secure the unit to the front frame downtube, and four 1-1/8-inch clamps that hold the plate to the lower twin frame rails (two per side) beneath the motor. The directions show the use of only one pair of clamps, but the kit shipped with two, I opted to use all the parts this time because I can see where they go. Don’t ask about the bolt pack I found on the floor after successfully installing everything to the bike.
I can only figure it came from another project bike’s kit, but for good measure I’ll bring it along with me like a lucky rabbit’s foot just in case I learn what it’s for along the way.
Wait! There’s more … again!
Additionally, a few lesser-noticeable items we added to the bike include a fork brace, a beefier rear master cylinder mount and protective guard, and a few other hands-on goodies like a dashboard for mounting electrical doo-dads and switches without drilling into the bodywork.
While pretending to be a rock-crawling trials-riding professional with your 500-pound “street” bike, that beefy new skid plate can’t protect you from every strike to your undercarriage. One of the more common breaks to the KLR is the unprotected stock forged rear master cylinder mount. Doubling as a brake lever mount and leverage point, damage here won’t leave you stranded, but you won’t easily continue riding without rear brakes.
Happy Trails makes a beefy CNC-machined aluminum billet replacement for the 2008 or newer KLR rear master cylinder mount for $42.95 plus another $3.95 for the hardware kit that includes longer-than-stock bolts. The hole through which the rear brake lever pivot pokes through is Teflon lined for smoother friction-free leverage. Takes only five minutes to install, comes with no instruction sheet and is a great addition regardless of your intended tour’s length.
For another $15 you can further protect the master cylinder itself with an aluminum crush guard for which there is no matching OEM part – purely additional protection. Light in weight and practical, this guard is a no brainer. Add it to your cart.
What the fork?!
Combine the lack of a wheel-hugging steel fender on the KLR with the added weight you just piled onto your adventure-seeking bike and torsional loads to the chassis and suspension start needing some attention. One shortcut around upgrading fork springs is to tighten up the ship itself. Bolting on a fork brace helps keep the fork tubes together for those uneven surfaces and stressful cornering circumstances.
HT makes an easy-to-install unit for $129.95 requiring no disassembly of the bike. Just push up the stock rubber fork boots, weasel in the disassembled brace laterally (across the tire), position it with enough clearance to allow the tires and fork tubes clear travel, and close her up the with the remaining tight-fitting pieces to the outside of the fork leg. Another five-minute install and you’re rolling again.
Finally…
Mr. Bernard at HT and his dedicated crew of riders and designers have thought of everything, and while we were focused on keeping the KLR intact in the event of a crash, they tossed in a handy dashboard for keeping our GPS’s and iPods charged while we were upright. It is convenient for adding Powerlet sockets within reach of the mobile rider without drilling holes in your bodywork. The uses are endless: iPod, electric vests, GPS. It takes just $25 and two minutes to add to your bike.
All told, thanks to having some friends with a garage full of organized tools, it took me only 4.5 hours to install everything you read about in parts 3 and 4 of this series. Tipping the scales around 480 pounds now, with all the protection, the old girl will surely climb over the next hundy marker with the addition of clothing and cameras. Wish us luck! A true road (and off-road) warrior has been born.
After all that wrenching, sweating and preparation, a fantastic voyage is well deserved – if it wasn’t the intent in the first place. A ride to Panama should do the trick! Stay tuned to read about how well the products performed.
Related Reading
Kawasaki KLR650 Project Bike: Part 1
Kawasaki KLR650 Project Bike: Part 2
Kawasaki KLR650 Project Bike: Part 3
Kawasaki KLR650 Project Bike: Part 5
Kawasaki KLR650 Project Bike: Part 6
Kawasaki KLR650 Project Bike: Part 7
Kawasaki KLR650 Project Bike: Part 8
More by Alfonse Palaima


Comments
Join the conversation