

Heated Grips Evaluation
In the parable of the Grasshopper and the Ant, the Ant toils through the summer. He slaves away in Nature’s little cubicle, storing grain and filing copies of The Economist. Meanwhile the Grasshopper plays in a rock band and gets all the chicks. Come fall, though, the temperature drops and the fun stops.
For this grasshopper, it is the effect of the cold on my hands that signals the end of my riding season. There are many possible approaches to remedy this, including heated gloves, heated hand-grips (thin inserts that go between the grips and the handlebar) or small inserts that go inside the handlebar itself. All require additions to – and in some cases, alterations to – the bike’s electrical system. I chose to go with a set of Polly Heaters. Polly Heaters are inexpensive and, as my Buell XB has clip-ons, I figured it would be a relatively straight-forward installation process.
When it comes to powering the Polly Heaters, I do not like the idea of tapping into the existing electrical system very much. While it may be possible to disable an OEM item and re-task those wires, it doesn’t mean the wires or relays are up to the task. Fuses are easily replaceable, but wiring harnesses are not.
The safest bet is to supplement the wiring harness of the bike with an appropriately sized, fused, and relayed accessory harness. One simpler option is to power the Polly Heaters via a direct link to the battery of the motorcycle. Unfortunately, I would forget to turn them off and the battery would soon be dead. This would set in motion despair, blame, guilt, and blisters.
The solution to this is to use a relay switch which is connected to the ignition of the motorcycle. If the bike is off, the accessory is off. To accomplish this, the relay is powered by a small mosquito bite of juice from an existing powered item. In this case I chose to tap the headlight system.
Instead of separately sourcing all the needed components, I instead turned to a company with an odd name: Eastern Beaver, a one-man gig run by a Canadian living in Japan. The proprietor, Jim Davis, sells everything you need in order to install just about any electrical accessory on your bike.
He also offers complete wiring kits that are made out of higher quality components than you find in your typical chain-store automotive supply house. The build quality on these kits far surpasses my chimp level. In less time than I could flint-knap a fresh set of tools, the kit arrived all the way from Japan. After retreating to the safety of the tree canopy, I gnawed open the package and was pleased to discover that the connectors on the harness were already waterproofed, and the wires were nylon sheathed.
The four enemies of a motorcycle’s electrical system – moisture, chafing due to vibration, inadequately sized wiring and general incompetence – were adequately addressed. In short, it won’t let the magic smoke escape.
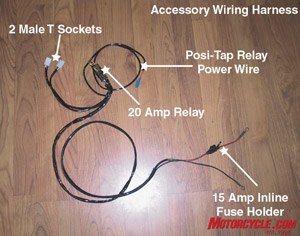
The accessory kit came with a single Posi-Tap connector. These connectors intrigued me, so I purchased a selection of Posi-Tap and Posi-Lock connectors in addition to the kit to aid in the installation process. To use these connectors all you do is strip off half an inch of insulation, insert the wire(s) into the connector and screw them together. You don’t even have to mummify them in wads of gooey electrical tape! The Posi-Tap is the star of the show. It only leaves a small pinhole in the insulation of the wire that is being tapped. It can be removed easily, and the connection is solid and vibration-resistant. To quote Meg Ryan: “Yes, yes, yes!”
The accessory wiring harness kit, priced at $39.95, is frankly worth it. Unfortunately, instructions are not included with the kit. The online instructions are reasonably thorough, however.
In order to install the new harness, some disassembly was required. The front fairing, mirrors, front turnsignals, airbox, ram-air scoop and tailsection were removed. Further, in order to install the Polly Heaters, the clip-ons were removed from the fork clamp but were not broken down further. I pried off the endcaps. I had hoped to be able to drill the clip-ons for wire installation without disassembling the switches or removing the handgrips.
I followed the existing wiring harness and, where possible, piggybacked the new accessory harness to it with the supplied tie-wraps. Soon it was time to turn my short attention span to the Polly Heaters.
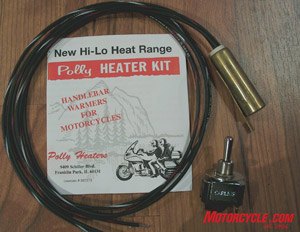
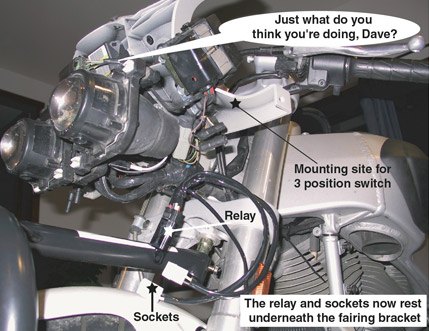
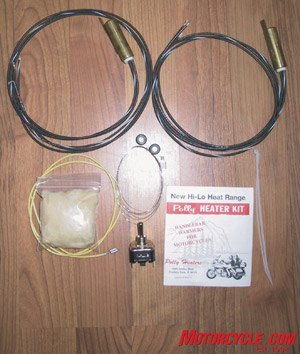
The Polly Heaters kit contains a three-position switch, two heater elements (with 33.5-inch wires), a small bag of insulation wool, a 32-inch yellow lead wire, a length of “fish” wire, two metal connectors, two rubber grommets, two tie-wraps, and a set of single-page instructions. The kit cost $31, and I chose to upgrade the switch in the kit to a metal-bound one for an additional $8. Installation of the kit requires you to drill three holes: two in the clip-ons/handlebars, and one in your fairing (or wherever you wish to mount the switch).
With my clip-ons removed, I marked a good position on each to put the 3/8-inch holes. I started with a much smaller drill bit and worked my way up. Soon I had two 3/8-inch holes drilled.
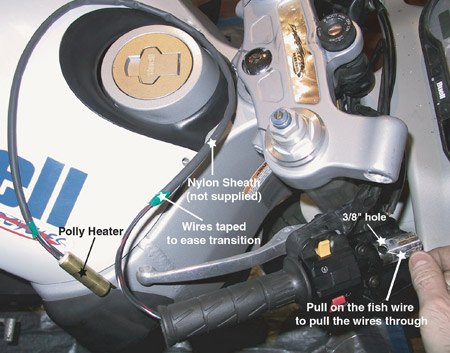
I taped the three wires on each cartridge heater together at the bare-wire end. I also put a nylon sheath (not supplied) over the three wires, as I wanted a bit more chafe protection. Finally, I attached the “fish” wire. This was fished through the clip-on and out the 3/8” hole. Soon the wires were out. I poked a small wad of insulation into the clip-on in front of the Polly Heater. I then bent the wire clip attached to the Polly Heater so it wouldn’t slide around in the clip-on. Poking the Polly Heater in with a pencil while gently tugging the wires, the Polly Heater was soon in position. Following this was another small wad of insulation, and I replaced the end cap. On the wire ends, I slid the supplied rubber grommets on. It took some stuffing, poking, and cursing until the rubber grommets were seated into the 3/8-inch holes.
I followed the existing cables/wires from the clip-ons and routed the Polly Heaters wires down through a gap in the fairing bracket. I made sure that nothing would bind when I moved the clip-ons back and forth through to the steering lock on each side. I used tie-wraps to ensure nothing would get kinky.
I found a location on the fairing where I could mount the three-position switch. I wanted the switch to be in a convenient place and I wanted to be able to use my left hand to operate it. That way, even if I was hotly pursued by a killer clown in a white van, I wouldn’t have to take my hand off the throttle to enjoy heated grips.

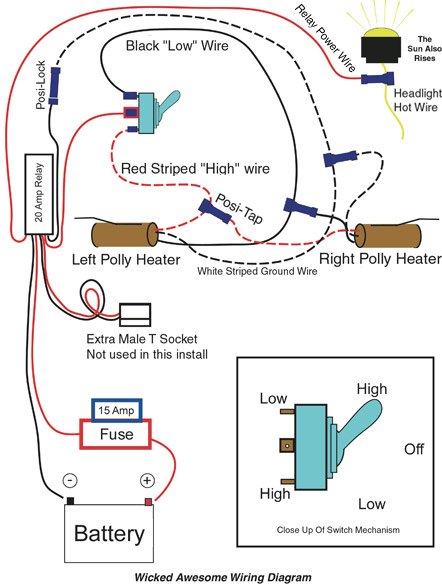
As I am sure you have noticed, six wires had to be merged down to form three connections. Posi-Taps were the tools of choice. The white-striped wire is the ground. The red-striped wire is attached to the “high” side of the switch. The black wire is attached to the “low” side of the switch. I was confused about the wiring of the switch until I imagined the switch as a pivot. The directions that come with the Polly Heaters could be clearer in that regard. I would rather light you a candle than curse your darkness, so I cobbled together a wicked awesome wiring diagram for you to follow.
I disassembled one of the two sockets with a small screwdriver and separated the two wires, as the plastic outer cover wasn’t necessary. The hot wire then went to power the switch. The ground wire was attached to the white-striped wires from the Polly Heaters.
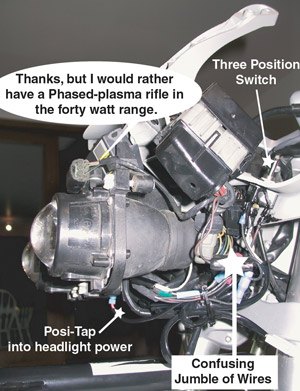
One of the final steps included finding a suitable power source for the relay switch itself. I tapped into the wire that powers the low-beam headlight. The relay doesn’t draw enough power to make a difference in the operation of the headlight, so no worries there. It is important to find a source of power that you are sure is off when the ignition switch is off. Also, I painted all exposed connectors with liquid tape. This provided some weather/short-circuit protection at the switch. Liquid tape is good stuff. Be cautious of merging it with the use of shrink tubing. Careful with that cigarette lighter, Cletus – liquid tape is flammable, so go have a beer and let it completely dry. Magic smoke could be lost!
I connected the negative and positive ring terminals to the battery and installed the 15-amp fuse into the fuse holder. I turned the ignition on and with great expectation flipped the switch to “high”. This accomplished nothing but room-temperature grips, so I wailed and cried and soaked the floor with caustic tears of bitter disappointment until I realized the problem. I had to turn the kill switch on as well, in order for power to go to the headlight – and, hence, power the relay. Soon the grips grew warm. Then uncomfortably hot.
I attached the temperature probe to the multi-meter and took some measurements. With the probe directly on the grip (positioned over the location of the internal Polly Heater), the temperature on the “high” setting soon reached a high of 162 degrees F! The temperature on the throttle grip was slightly cooler at 147 degrees. The “low” setting averaged 115 degrees. Be advised that the high temperatures will be much more comfortable in actual riding use – think frost and 75 mph. Regardless, the “high” setting of the Polly Heaters may turn your gloves into sacks of sizzling Vienna sausages.
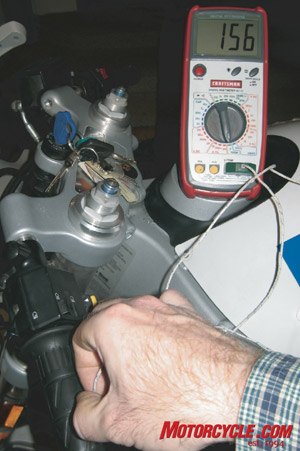
The high temperatures surprised me, so I measured how much current the Polly Heaters draw. The “high” setting drew 2.76 amps, and the low setting drew 1.85 amps. This is directly in line with the Polly Heaters rating of 3 amps and 36 watts on high (measured 34.22 watts). Essentially, the Polly Heaters work exactly as advertised.
This project has left me with warm hands and a moderately lighter wallet. While there are many ways of getting warm grips on your bike, Polly Heaters remain one of the best. Polly Heaters first hit the groovy scene in 1969, and they have remained a small family business.
I would like to see Polly Heaters offer a product with a rheostat (infinitely controllable dial mechanism), and perhaps while they are at it, incorporating a relay in as well. This would add to the cost, but what cost comfort? Anyway, as it stands the kit comes with everything you need to make the product work and the kit is very reasonably priced.
You can order Polly Heaters direct from their website, but be advised they are not set up for credit card orders. Checks (you remember those, right?) and money orders will get your Polly Heaters to you pronto.
Eastern Beaver’s Jim Davis is helping to fill a niche. If you need to wire in an accessory – an HID light, a louder horn, a fondue pot, etc., then peruse his website. He also sells Posi-Lock brand connectors. Posi-Lock (and particularly Posi-Tap) connectors are simply a better mousetrap.
While the snows of winter are inevitable, heated gear can keep you in the field longer and get you out earlier in the spring. Rock on, Grasshoppers!
Sources
Polly Heaters
Eastern Beaver wiring harness/supplies
Information about Posi-Lock connectors
Related Reading
More by Leif Merryfield


Comments
Join the conversation