


Road Racing Series - Part 8
Made it this far? Well we're almost done. In this final article we'll give you the finishing touches in our Supersport racer build.
Body Work
Changing the bodywork on a race motorcycle is about more than cosmetics. Aftermarket pieces save weight, are more durable in the case of a crash and incorporate an oil catch pan. To fit within Supersport rules aftermarket bodywork must retain the profile of the stock plastics. Some models, like the SV650, are allowed to use a full-fairing design even though the factory model only has a half fairing.
Bodywork is one of a racer’s biggest investments, and it's understandable that a racer on a budget will shop around for the best deal. Just make sure you know what you're buying. Is the bodywork made out of plastic or fiberglass? Plastic tends to be heavier, more likely to break and harder to repair. Ask a body shop man if he would rather try to repair plastic or fiberglass. Fiberglass can often be repaired at home or trackside.
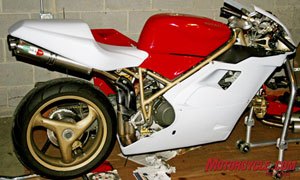
Does the bodywork come primed and ready to paint or will you have to do the final prep work yourself? Are the panels pre-drilled and, if so, will they fit? If they're not, you'll have to temporarily mount the fairing, mark the holes and then remove it for drilling (measure twice, drill once). For our build, our bodywork was supplied by Sharkskinz, the pieces came pre-drilled, primed and fit perfectly.
"Bodywork is one of a racer’s biggest investments..."
How you attach bodywork is crucial. The lower part of your fairing that serves as an oil catch pan will have to be removed every time you get a tech inspection. Other parts will have to be removed quickly to make repairs and to fix or replace crash damage. OEM-style screws won't do. Quarter-turn fasteners, like the famous Dzus (pronounced "zeus") design will do the trick. Dzus fasteners require you to replace the threaded tab on your frame (usually a slip-on design) with their tab. The fasteners are permanently affixed to the bodywork.
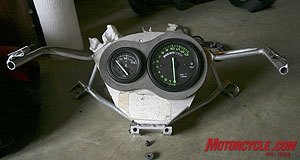
Once you remove your headlight you're probably left with an empty "bucket" that also serves as a fairing stay and a mount for the gauge cluster. An aftermarket fairing stay sheds weight and is more durable in case of a crash. The aluminum Vortex unit that we used had a provision for only the tach, doing away with the Ducati's speedometer and "idiot" lights.
Once you've got your bodywork on, you can choose to keep that raw test bike look of primer or have it painted for a more durable finish and a professional look. Unless you have professional equipment and a paint booth, the price of paint is worth the investment of paying a professional painter to apply it. Be careful when you decide on a local paint shop. Painting fiberglass is somewhat of a specialty and not something that all auto body shops know how to do.
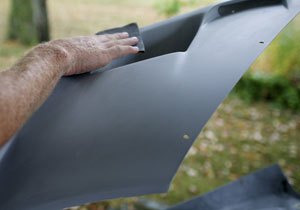
Call it lack of creativity or call it love for the original all red Ducati paint scheme, but I chose to make the bike look as close to the original street machine as possible. Since I wouldn't be painting the tank or airbox panels I needed to make sure the fairing paint would match exactly. I'd tried to match paints before at the local automotive paint supply stores with less than satisfactory results. If you want a perfect match you have to go with Color Rite brand. The company has a relationship with major OEMs, which means their paint isn’t just close to the original color, it's identical.
Color Rite stepped up to the plate, supplying us with an OEM-matched "Italian Red" paint along with their recommended thinners and hardeners. Since the Sharkskinz bodywork comes pre-primed, the only prep work I had to do was a light scuff sanding, and then the pieces were off to the painter. A week later I picked up the perfectly color-matched set.
Color Rite also supplied color-matched paint for the frame and wheels and original Ducati white to paint on permanent "expert" number plates that would be hidden under the stick-on vinyl amateur plates.
Stock sportbike windscreens are mainly for looks and afford little wind protection to the average-sized rider. Racers may opt to replace the stock screen with a lighter and taller model that will give them something to tuck in behind on the long straights. We installed a tall "Corse" windscreen from Fast by Ferracci.
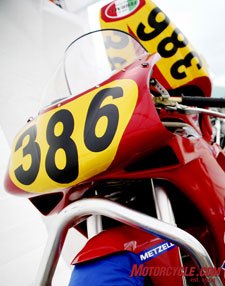
When you get your racing license, you will be assigned a number that must be displayed prominently on your motorcycle. Your racing organization will tell you where your numbers need to be. You can have the numbers painted on when you have your fairing painted for a clean, professional look or they can be put on with a yellow vinyl backing and black stick-on numbers. I opted for the latter, hoping that my "novice" status, as designated by the yellow backing, would soon be replaced with "expert" white.

Official lap times are gathered through a bike-mounted transmitter that registers each time you cross the start/finish line. The units themselves are supplied by the sanctioning body at every event and returned when the weekend is over. The mounts or pouches that attach the transmitters to your bike can be purchased from the tech inspectors at your first race. Place your transmitter where it will be protected in the case of a crash, but where it can be visually inspected to make sure the transmitter is on and in place before you take to the track.
Frame
The 748 was available in both a "Monoposto" solo seat and a "Biposto" dual-seat version. More than just a solo seat, the Monoposto version uses a completely different rear end with an aluminum subframe. I found someone on the internet who had a solo-seat bike and was interested in my dual-seat version, so we swapped. The different frame also required changing the rear portion of the wiring harness to match.
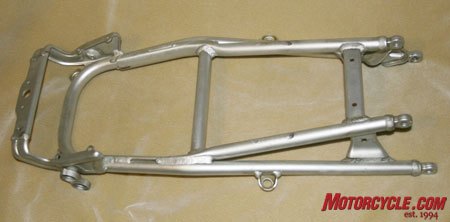
Although most other brands of motorcycles don't come from the factory with different versions of their rear subframe, lightened aftermarket subframes for racing applications are available.
Fit
Though I left "fit" for near the end of my priority list, it's one of the most important things on a race bike. A bike that is uncomfortable to ride is a bike that is hard to ride and will cause fatigue early on in a race. But many fit issues can be addressed without spending a lot of money.
Racers should take the time to adjust clip-ons, hand and foot levers and footpegs to fit their bodies. Sit on your machine in you racing gear and see where your hands and feet naturally fall. Try and adjust the controls accordingly. If you can't afford to add rear-sets, you should at least change the footpegs from the flat serrated-on-one-side OEM design to a round peg that is knurled across its entire surface to give you grip no matter where your feet are positioned as you hang off the bike.
But the range of adjustability (if any) on most stock motorcycles will not accommodate all riders. When a rider runs out of adjustment they need to go to aftermarket clip-ons, rear-sets and levers.
Clip-ons can change the angle and drop of the stock bars. They tend to be heavier-duty and more likely to survive a crash than stock bars. The Speedy Moto clip-ons we installed allowed for a wide range of adjustability in all directions and also had a provision to mount our remote master cylinder reservoirs.
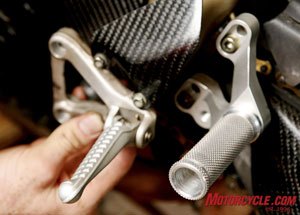
Rearsets do just that. They move the footpeg position further back and higher for increased ground clearance and a more aggressive riding position. Most rearsets have a range of adjustability so the pegs can be tailored to fit the rider. The footpeg mounts don't fold up like OEM pegs to add to crash protection. In case of a crash, individual pieces can be replaced so the whole unit isn't scrap. I installed a set of Woodcraft CFM rearsets. They are machined from billet aluminum for light weight and durability. Fit is excellent and close tolerances negate the "slop" that the OEM shifter had. As mentioned before, most rearsets come with the pieces necessary to convert your shift pattern to GP style.
The stock Ducati Brembo levers are adjustable, as were the Brembo radial units that replaced them. Adjustable levers don't just accommodate a rider's hands, they can also adjust the clutch pull or amount of feel a front brake has if you're riding on a rainy surface or as your pads wear. The Brembo units allow for this to be done with a gloved hand "on the fly." Even if you're running stock master cylinders, it's worth it to purchase aftermarket adjustable levers.
The seat on a race motorcycle is not designed for comfort, because you're not going to be spending a lot of time in it. It is most important that the seat surface is smooth without edges or welts so that a racer can slide across it as they move their body around the bike.
The Sharkskinz bodywork can be ordered with a provision for the stock seat or a foam pad. We opted for the foam pad, to save weight. The foam can also be layered or cut down to fit the rider's style. Its smooth surface allows for your leathers to slide from side to side as you transition your body.
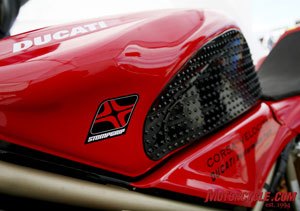
Racing leathers tend to be slick, and if you can't grip the painted surface of the tank with your knees, a last-marker braking maneuver is sure to send your most sensitive of body parts on a blind date with the gas tank. Being able to support your weight by gripping the tank with your knees is also crucial to prevent fatigue in the wrists and to keep a rider from overloading the front end with their body weight.
Stomp Designs is a company that got its start in the extreme sports business, making grip pads for surf and snowboards. When they branched out into the two-wheeled arena, they quickly came up with one of the best designs available. The Stomp Grip pads are custom-sized for individual bikes or they can be ordered in a cut-to-size universal sheet. They stick onto the metal or plastic of a tank with 3M backing. The pre-cut units we were supplied with fit perfectly and applied easily, putting a grippy surface right where your knees contact the tank.
The Slick, the Sick and the Trick: Road Racing Bling
If you spend time leafing through the pages of a performance catalog like Lockhart Phillips you'll be overwhelmed by the variety of parts and accessories, billet this, titanium that, and how quickly they could break the bank account of a newbie racer. There are plenty of other parts that won't make you faster but will make your bike function better on and off the track. As you become a better rider, saving weight will become more important. These parts aren't only lighter and sexier, they're more durable and will last longer under the stress that racing puts on all of a machine's components.
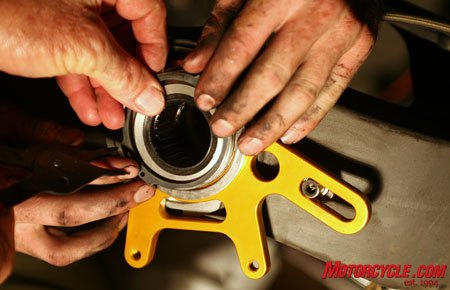
When it comes to the Ducati 748-998 series of motorcycles, the go-to trick part specialists are Mad Duc, a small company out of Sun Valley, CA. They supplied us with several of their billet aluminum anodized parts, including a rear brake caliper mount, ride-height adjuster, rear axle nuts and a rear sprocket hub for lighter weight and better durability.
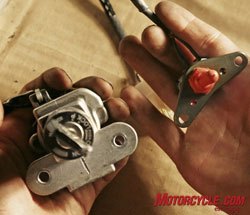
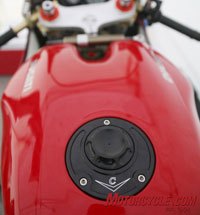
One of the most practical parts that Mad Duc supplied us with is their "keyless" conversion. There's nothing like trying to keep up with a set of keys while wrenching on a bike at the track. Mad Duc offers a toggle switch that replaces the bulky, stock ignition key. A screw-on gas cap makes for easy access to the fuel tank for between session re-fills. The last piece of this system is a machined "button" that replaces the key tumbler on the seat latch mechanism. This allows you to use Ducati's original hinging and locking rear tailsection system without having to use a key.
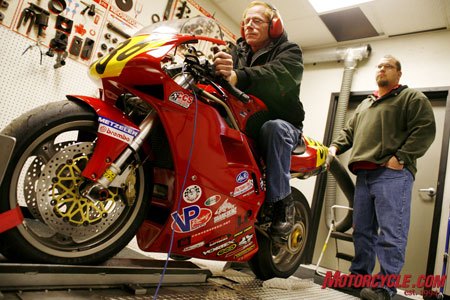
After we completed all our modifications, it was time to take the bike to have the Power Commander zeroed in on a local dealer’s dyno. While the 748 was on the truck, I put it on the scales to check its post-build weight. Months ago I had weighed the stock machine with half a tank of fuel, and it tipped the scales at 460 lbs. In racing trim it was down to 420 lbs. The modifications and removal of stock equipment had shed nearly 9% of the 748’s original weight. I think I have a new motorcycle.
Want to see what it's like to attend your first race. Keep an eye on Motorcycle.com in the upcoming weeks to see what happens when we take the 748 we built to the track.
| Building a Supersport Spec Racebike Budget - Stage III | |
| Bodywork | |
| Fiberglass Bodywork | $500 - $1,500 |
| Paint | $250 - $750 ($200 - $500 for professional painting) |
| Seat or Foam Pad | $20 - $250 |
| Quick-Release Fasteners | $20 (each) |
| Fairing Stay | $150 - $200 |
| Windscreen | $75 |
| Oil Pan (attach to original fairing) | $120 |
| Frame | |
| Aftermarket Racing Subframe | $250 |
| Fit | |
| Clip-ons | $150 - $200 |
| Levers | $75 to $250 (each) |
| Rear-Sets | $300 to $650 |
| Stomp Grip | $42 |
| The Slick, the Sick and the Trick: All the Other Parts | |
| Keyless Gas Cap | $100 to $150 |
| Keyless Switch | $85 to $100 |
| Tools | |
| Rear Stand | $90 to $175 |
| Front Stand | $120 to $175 |
Building a Supersport Racebike - Total Cost (not including the motorcycle):
$500 to get your bike on the track
$2,000 - $3,000 for most important upgrades
$5,000 - $8,000 to make an AMA-spec Supersport machine
| Motorcycle.com 2000 Ducati 748 Supersport Build Sheet | |
| Tires | Metzeler Racetecs 120/70 X 17 and 180/55R X 17 (K1 soft compound) |
| Wheels | OEM Brembo three-spokes (as required by Supersport regs) |
| Brake Calipers | OEM Brembo P4 (front) and P2 (rear) (as required by Supersport regs) |
| Front Brake Rotors | Brembo HP 320mm full floating |
| Rear Brake Rotors | OEM Brembo |
| Brake Pads | EBC HH |
| Front Brake | Master Cylinder: Brembo 19 RCS forged radial |
| Rear Brake | Master Cylinder: OEM Brembo |
| Brake Lines | OEM stainless steel |
| Front Suspension | OEM Showa GD 131 forks (as required by Supersport regs) with Race Tech springs, Gold Valve and oil |
| Rear Suspension | Ohlins DU 143 (3420) (Ducati 996 take-off) with Race Tech spring, re-valve and rebuild |
| Front Sprocket | Fast by Ferracci steel 14 tooth sprocket |
| Rear Sprocket and Carrier | Fast by Ferracci quick change carrier with 40 (+2 from stock) tooth aluminum sprocket |
| Chain | 520 GPZ Grand Prix |
| Frame | OEM (as required by Supersport regs) |
| Swingarm | OEM (as required by Supersport regs) |
| Subframe | OEM (aluminum "monoposto" version)/TD> |
| Triple Clamp | Scotts billet aluminum |
| Steering Damper | Scotts rotary damper |
| Bodywork | Sharkskinz fiberglass AMA Supersport legal with oversized air runners |
| Paint | Color Rite OEM Color Match |
| Windscreen | Fast by Ferracci Corse |
| Air Filters | Mad Duc red "race" |
| Airbox | OEM (as required by Supersport regs) |
| Engine | OEM unmodified (as required by Supersport regs) |
| Transmission | OEM (as required by Supersport regs) |
| Battery | Yuasa YTX7L-BS maintenance free |
| Coolant | Water with Redline Water Wetter |
| Brake Fluid | Brembo EVO.Sport 500++ |
| Engine Oil | Motul |
| Clutch | STM Evoluzione 90mm slipper with 12 tooth basket and Progressive Engagement Plate (PEP) |
| Clutch Master Cylinder | Brembo 16 RCS forged radial |
| Clutch Slave Cylinder | OEM |
| Clutch Line | OEM stainless steel |
| Fuel Injection System | OEM Marelli indirect injection (as required by Supersport regs) |
| Fuel Injection Management System | Power Commander III USB |
| Quick Shifter | Power Commander Quick Shifter with "Pull" type tension sensor |
| Engine Management System | OEM Weber IAW 1.6M ECU (as required by Supersport regs) with Fast by Ferracci Stage 1 EPROM chip |
| Exhaust | OEM headers, OEM mid-pipes and Fast by Ferracci 45mm titanium slip-on |
| Gauges | OEM tachometer, oil pressure warning light and temperature gauge |
| Rearsets | Woodcraft-CFM |
| Clip-ons | Speedy Moto adjustable |
| Upper fairing stay | Vortex |
| Levers | Brembo |
| Crash Protection | Speedy Moto under body work frame sliders, Speedy Moto front axle slider, Speedy Moto clutch cover, Vortex bar end slider |
| Miscellaneous | Mad Duc race fuel cap, Mad Duc ride height adjuster, Mad Duc tail lock release button, Mad Duc rear sprocket hub, Mad Duc rear brake caliper bracket, Mad Duc ignition toggle, Mad Duc rear axle nuts, Mad Duc speedometer drive replacement adapter, Mad Duc seat pins |
| Wet weight before build | 460 lbs |
| Wet weight after build | 420 lbs |
Links
Sharkskinz body work
Color Rite paint
Vortex performance parts
Woodcraft CFM rear sets
Speedy Moto clip-ons
Stomp Design tank grip
Corse Velocita, Mad Duc Ducati performance parts
Related Reading
Road Racing Series - Part 1
Road Racing Series - Part 2
Road Racing Series - Part 3
Road Racing Series - Part 4
Road Racing Series - Part 5
Road Racing Series - Part 6
Road Racing Series - Part 7
Road Racing Series - Part 9
Road Racing Series - Part 10
Road Racing Series - Part 11
More by Jeremiah Knupp


Comments
Join the conversation