

How to Change Your Oil
The riding season is heating up and it's time to put some miles into the beast. But, how long has it been since you changed your oil & filter? Thing is that with today's synthetics offering unprecedented mileage between oil changes, it is easy to forget this crucial task. Even if you are not a big mile muncher and you are still a few thousand miles short of the recommended oil change interval, a once a year change is a healthy policy and very much akin to renewing your engine bearings for the riding season.
Oil changing opens up the usual debate about which oil to use. I won't go into all the pros and cons of synthetic vs. semi-synthetic vs. mineral in this DIY article. My tip is: if you are someone who really piles up the miles or loads the engine constantly, go with the best synthetic oil that you are willing to pay for (Be sure your bike likes whichever oil you choose. My ex-SV650 wouldn't shift correctly under race conditions and would frequently slip out of gear, with Mobil 1 MX4T. -Sean). On the other extreme, if you ride an old hack that consumes oil, your routine oil top-off is going to constantly renew the all important anti-friction additives and detergents in the crankcases anyway. In that case, it would be pointless to go for expensive and long lasting high-end oils and you would do well with an old-fashioned mineral. For all those in between cases (which means most of us), you won't go wrong by sticking to the recommendation in your owner's manual or by choosing those mid-range semi-synthetics. Regarding the filter, some say that forcing new oil through a used filter is not the best idea and I have to agree. Changing the oil filter on each oil change rather than on every other one is not a bad policy.
OK, let's get into the nuts and bolts of the thing. Oil and filter changes are not hard to do, but if your tool kit is limited to the stuff contained in the pathetic plastic roll supplied with the bike, you'll need to source some extra items. If your bike is not equipped with a center stand, you'll have to get a race stand and maybe even add those small bobbins (spools) that allow secure lifting with it. If that's too troublesome, find another solution to holding the bike upright safely (and I mean safely). A bike falling off the top of two car jacks is no fun. Don't even ask me how I know.
A few suggestions: Take your time, think before doing, and picture what's going to happen next. A moment of distraction can turn a money saving DIY job into a nightmare of broken parts and smashed knuckles. It's not a bad idea to study your owner's manual and examine the bike itself, before beginning. Are you sure, you know where your oil drain plug is located? A few preparatory steps are in order. It's not a bad idea to degrease and rinse the area around the oil filter so that no dirt finds its way into the engine. Then, go for a ride! Just a few minutes to get the oil warm so it drains better. Place the bike on its center or race stand. Now, if you are working alone, you'll appreciate the last "tool" on the list. Position your chosen means of support under the fairing and you'll save yourself the grief of fairing lowers hanging on the last screw while cracking the soft plastic and surrounding paint or just plain dropping on the floor. (Fig. 1) With the fairing lowers supported, start to undo the screws that retain these lower portions and make sure you really removed ALL of the screws. (Fig. 2) With the fairing lowers free, pull one side towards you and turn them so they clear the exhaust system. (Fig. 4,5) |
Figure 1:
Figure 2:
Figure 3:
Figure 4:
Pull them from under the bike and place them upside down on some rags. While doing this, try not to lose any of the captive nuts that sit on the fairing's edge. (Fig. 6) Place plenty of newspapers under the bike, covering way more than you think you should. (Fig. 7) Things will get messy soon. Now it's the time to put on those surgical gloves. (Fig. 8)
Figure 5:
Figure 6:
Figure 7:
Figure 8:
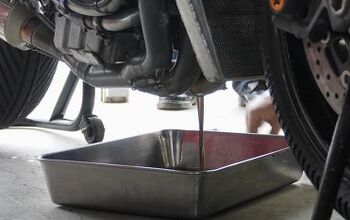
Besides keeping your hands clean, direct skin contact with used engine oil is best avoided as the stuff contains quite a few carcinogenic compounds. With the proper socket, free the oil drain plug, but do not un-screw it yet! (Fig. 9) Place your oil receptacle under the engine, taking into account the expected direction of the oil stream. Now you can undo the last few turns retaining the drain plug, while trying to catch it before it drops into the container. (Fig. 10,11) Don't just stand there while your bike takes its yearly pee.(Fig. 12)
Figure 9:
Figure 10:
Figure 11:
Figure 12:
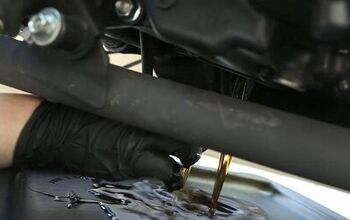
Closely watching the oil stream is recommended. A slightly discolored streak is expected but if you see a noticeable silvery shade in the oil stream, then things might not be so OK in the engine or gearbox. Examine the oil drain plug, most likely it's of the magnetic type. A silvery paste deposit on it is OK but if you see some noticeable metallic debris it's a sure sign of gearbox problems. Clean the plug with a rag and put it aside. (Fig. 14) While the oil drains out, you can remove the oil filter, just make sure you placed some newspapers under it too. With luck, a fresh rubber glove on your hand and a clean filter, you might be able to make it move. Mine didn't. Another cheap solution is securing a big hose clamp around it and freeing it with a few hammer blows through a long screwdriver. (Fig. 15) The tool I use is made of a screw tightened metal band that wraps around the filter while providing leverage, but I must say that the exhaust pipes next to the filter make it extremely hard to use. (Fig. 16-20)
Figure 13:
Figure 14:
Figure 15:
Figure 16:
Figure 17:
Figure 18:
Figure 19:
Figure 20:
Another efficient and cheap option is wrapping strong nylon webbing around a long socket fitted on a T-Bar. (Fig. 21-22) The turning action will clamp the webbing on the filter and provide releasing torque. The beauty of this solution is that you can approach the filter from its front end. Of course, if you don't want to delve into these creative DIY solutions, simply get the aforementioned oil filter cup socket. Once you have it removed, place the oil filter in a plastic bag for disposal.
Take the new filter out and spread some grease or clean motor oil over the O-ring. (Fig. 23-24)
Figure 21:
Figure 22:
Figure 23:
Figure 24:
Install the oil filter and screw it in by hand, until the O-ring just touches the cases. From this point, you should tighten the filter by another 1.5-2 turns. Some of it can be done by hand, but use one of the described methods to achieve the required tightness. Now it's time to re-install the oil drain plug. Both the filter and the drain plug should re-thread smooth and easy. If it isn't easy, it means that there is debris in the threads of you are cross-threading the item. If this happens, remove it, wipe the threads and try again with a straighter shot. Remove the oil-fill plug, and feed the engine with the required amount of oil. (Fig. 25-26) If you don't have a manual, you might find the amount written on the clutch cover, near the filler hole. Still no luck? Pour in enough oil to reach the mark on the oil level sight, or the upper line on the dipstick, fit the plug back and start the engine for a minute. This should fill the filter with oil. After that, you'll need only to top up slightly to reach the required mark, just don't forget to re-tighten the oil-fill plug. This short start-up to fill the oil filter will also give you the chance to check for oil leaks around it, before re-mounting the fairing lowers. Everything OK? Move the messy and oily newspapers to the side and be sure not to roll your bike through any standing oil. Place the empty oil bottles on the newspapers and refill them with the used oil. Don't forget to take the used oil and old filter to a nearby service station for proper disposal. Put the dirty newspapers in a plastic bag and proceed to re-mount the fairing lowers, supporting them with your faithful Yellow Pages volumes.
We're not done yet! If you ride a Beemer, a Guzzi, a shaftie or a motocross bike, you might want to change the oils in the gearbox or final drive. It's very much the same procedure, save for the fact that there is no oil filter involved. But then, there are other items that require lubrication too. For instance, when was the last time you lubed your cables or levers? Although there are cable-lubing kits that make the job somewhat simpler, I prefer to do it in the classic way. The main trouble is disconnecting the cables from the throttle housing and clutch lever. With the cable pulled off, I simply construct a paper cone around its end using a business card and some duct tape. Secure the cable's end so it remains in a vertical position and fill the little cone with engine oil.(Fig. 27-29)
Figure 25:
Figure 26:
Figure 27:
Figure 28:
Be sure to place something at the other end of the cable to catch any overflow. Leave the cables like this for a few hours and after fitting them back, you'll just love the new found smoothness of the throttle and clutch. Speaking of levers, it won't hurt to dismantle both hand levers and grease their hinge pins. Another tactical point to grease is the front brake lever fulcrum (Fig. the point that actually presses on the master cylinder's piston). (Fig. 31-33)
Figure 29:
Figure 30:
Figure 31:
Figure 32:
There is a slight sliding movement between the brake lever and piston, which can create unwanted friction. A well-placed grease spot can restore much of the lost sensitivity of the front brakes. Strange but true.
Figure 33:
Uuuh... now the control pedals are getting envious. Bet they haven't seen much grease for years. So before your foot controls develop half an inch of side play, why not give them what they deserve? In the case of my Suzook, releasing the 17 mm nuts found residing on the inner side of the footpeg holding plates frees the whole footpeg assembly and allows me to grease the plain bearings of the foot levers as well as the rear master pump and gear lever pushrods and pins. (Fig. 30) This is the kind of TLC that very few shops will ever shower on your scoot.
More by Yossef Schvetz


![Can You Change Your Tire While Riding? [video]](https://cdn-fastly.motorcycle.com/media/2023/05/07/11552623/can-you-change-your-tire-while-riding-video.jpg?size=350x220)


Comments
Join the conversation