


Do It Yourself Helmet-Cam
At some point, nearly everyone who rides a motorcycle will attempt to duct tape a camcorder to their gas tank and shoot some "gun camera" footage strafing their favorite canyon, doing the big cohones double jump or caning their two-stroke through the dunes. Unfortunately, the low-tech approach usually yields poorly focused shots through a dirty windscreen and camera get-offs. For professional quality work a compact helmet camera system that uses a digital camcorder as a portable VCR is tough to beat.
If you already own a camcorder you are just a few Ben Franklin's away from narcissistic nirvana starring in your own movies.
Technical Details
You'll need a digital camcorder with either external audio and video inputs or video tape recording capability. In the event that you are using an analog camcorder, gimme a ring, when you decide to join the rest of us in the 21st century. Assuming that you have a digital camcorder, if you can record from a TV onto your camcorder it will function as a VCR and you are set. This feature is available on most digital camcorders and on almost all of Sony's camcorders.
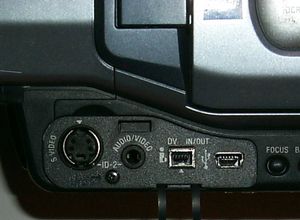
Some bullet cameras have analog outputs that are compatible with external camera inputs, where you bypass the camcorder's camera but retain all of the rest of the capture features. As it turns out, many camcorders are not equipped with this feature but it's nothing to worry about. Overwhelmingly most helmet cam systems bypass all of the camcorder's video/audio preamps and just use the camcorder as a VCR. All you'll need is the ubiquitous AV Mini - Phono (RCA) x 3 cable to connect all of your external video and audio with almost any camcorder.
Inexpensive bullet cameras come in basically two configurations: either 380 or 480 lines of resolution and NTSC or PAL output. I find that the 380 line cameras work just fine and are a good deal less expensive. In North America, any camera that you purchase should communicate with the camcorder in DV-NTSC format (in Europe DV-PAL is the standard). Some high-end cameras will output either format. In the event that you are using an analog camcorder, gimme a ring, when you decide to join the rest of us in the 21st century. Be aware that by using your camcorder as a VCR you'll bypass not only onboard audio and video capture but also most, if not all, of the capture features such as image stabilization, low-light shooting, etc. This is actually not as much of a problem as it sounds since digital video editing/processing software will fix (albeit with some effort) most problems that occur during capture.
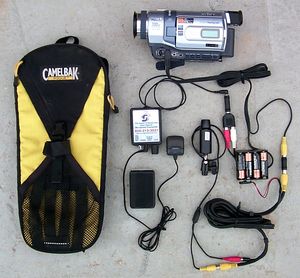
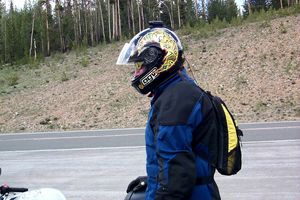
The system I use (pictured below,) consists of a bullet camera purchased through eBay for about $150. The camera is a 380 line CCD color unit with a 1/8" mini-plug output. It came with an optional camera housing, a 12-volt battery pack, various RCA connectors, and stereo 1/8" phono plugs (stereo mini-jacks). I purchased an AV Mini-phono (RCA) x 3 Cable at Radio Shack for connecting all of the audio and video feeds to a Sony TRV-340 camcorder via the A/V jack. I also use a stereo RCA-to-mini jack adapter, for audio and a couple of RCA turn-arounds for interconnectivity. The camcorder and pre's go in a "Camelback" style backpack that's low profile and aerodynamic, you can also use a simple fanny pack. The bullet cam attaches to my racing helmet with industrial strength Velcro and I've never had it move as much as a smidgen, when subjected to howling 150 mph winds. For my dirt-bike helmet, I have a small mounting bracket that attaches the camera conveniently via one the visor screws.
For quality audio I use a Sound Professionals SP microphone preamp (available at: http://www.soundprofessionals.com/cgi-bin/gold/category.cgi?category=540&template=mics for about $160). This preamp provides phantom power to the microphone (so that it can be powered with a easy to find 9-volt battery instead of the AG13/LR44 onboard "watch" battery used by the mic) and has an adjustable gain control with three ranges. The use of this high-end preamp allows one to fully exploit the wonderful sonic qualities of the Sony ECM-717 directional stereo microphone (about $90). A very nice feature of directional mics is that they reject sound outside of their pickup patterns and thus, in most circumstances, minimize unwanted sounds such as wind noise if you can aim them properly.
Putting Together a System
My favorite one-stop place to look for all my helmet camera needs is helmetcamera.com. You can't go wrong there.There are several methods of putting together a helmet camera video system with an external microphone that will produce excellent results. Because I own an audio business, I feel very comfortable sourcing individual components and assembling my own systems. With some careful web shopping; if you are familiar with A/V components and interconnectivity you will easily be able to put together an excellent system along the lines I've described above (without the high end preamp and mic,) for less than $300. However, if you are one of those individuals who are befuddled by the flashing 12:00 on your VCR every time the power goes off, have no fear - it's easy to purchase a complete "turn-key" helmet camera system from any of several vendors on the web. My favorite one-stop place to look for all my helmet camera needs is http://www.helmetcamera.com/. Dan Krahling the proprietor of this site, is an ex-racer who puts together high quality systems that are rugged and quite inexpensive. You can't go wrong there. Dan and his crew will hook you up with a fabulous plug and go system.
I chose each of the seven clips that accompany this story to illustrate a particular advantage or limitation of helmet-mounted camera systems and external microphones.
The first two clips are from a dirt bike trail just a few miles from my home in Idaho. I really like the way the pipe sounds in these clips with gear changes and engine revs easily audible. I clipped the ECM-717 to the bottom of the fanny pack and was able to get it aimed in such a manner that the pipe was squarely in the middle of the mic's pickup pattern. The clips are video of a 5-minute ride up a canyon covering a distance of about 2.5 miles over fairly rocky terrain. In this case one of the major strengths of the helmet mounted camera system, it's location on the highest, most stable and smoothest position, has the effect of slowing down motion, thus making the terrain appear less rugged than it really is. You have to look for the fender, which is occasionally visible in the lower portion of the frame bouncing up and down to give a sense of the fact that major portions of this trail are composed largely of loose softball-sized rocks. There are a couple of pretty good whoops near the top of the trail (second clip) and other that a brief increase in engine revs and relative stillness of the shot for a second you'd never notice that you were in the air.
If you get some great shots make sure to send them in to us. We are always on the lookout for anything that smacks of mayhem or stupidity.
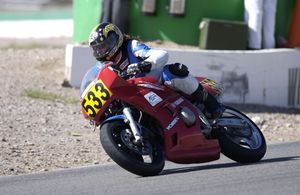
On this particular day, the wind was blowing at approximately 40 mph most of the afternoon, so you'd get a lot of wind noise in the audio signal, even while sitting still in the pits. In the clip, the wind is blowing so hard that if you pay attention you'll see my riding partner, John Fisher, nearly get blown off his bike just before I pass him on the inside at the beginning of the front straight (a little before midway through the clip). In windy environments, there are two options for getting clear sound, one much better than the other. The first and best option, is to just clip the mic to the bike as close to the rear of the silencer as possible. This works on the street, but many track organizations will not let you out on a track with a camera system unless it is fairly well zipped up. The second option is digital filtering of the audio track, to electronically reduce the wind noise.
In all cases, the mpegs format necessary for transmission over the web reduces the quality of the images. The native AVI images are bold, smooth, and have little to no grain, even when played on a large screen TV. I apologize for the wonky camera aiming, but at the time I shot these clips, they were just for personal use and I didn't bother to get the camera mounted exactly straight on the Velcro. It Ôs always advisable to make a test run or two, to finalize the lens aiming, before doing the bulk of that day's filming.
That should about do it. If you get some great shots make sure to send them in to us. We are always on the lookout for anything that smacks of mayhem or stupidity.
More by Martin Hackworth


Comments
Join the conversation