

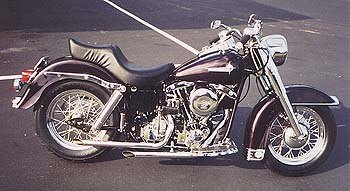
Classic Rebuild: 1972 Harley-Davidson FLH
It all began with a desire to get a basket case.
This is not an unusual desire these days, not with waiting lists and sky-high prices for some of the more popular Harley-Davidson models. In Harley parlance, a "basket case" is a pile of parts in the corner of someone's farmhouse, often contained in baskets. Restoring a "basket case" is a respected way to gain admittance to the fraternity that is Harley-Davidson. However, there are only so many to go around, and since practically everyone with a shred of technical know-how is buying them up, even basket cases are now becoming an endangered species.
After searching for six months I finally found one. I live in Georgia, and when the humidity slips down to less that 80 percent, we think we're in a drought. Needless to say, this is hell on metal, especially un-loved, neglected metal. Although the old Hog was in one piece, it needed serious tender-lovin'-care. After mulling it over I decided I was going to do to this bike all the things I wanted to do, but couldn't, to the other Shovelheads I owned. I was going to tear it down to the frame and start all over again. I was going to sweat the details. I refused to surrender to greed and half-ass the job then sell it off to make more money.
I was going to do it right, even if it was going to hurt me. Thus began my pain.
Motor-vation
I started with the motor. After cracking open the cases a water moccasin snake and three black widow spiders scurried out. Yet when I had started it up I couldn't believe it ran as well as it did. The pistons were already .070" over and you could measure the rod end-play with a yardstick. "They always run great right before they blow up!" said a mechanic friend.
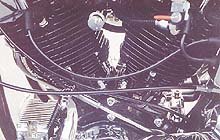
I sprung for a new set of original equipment connecting rods (still available from the factory), along with original cylinders and pistons. The flywheels were fitted with Jim's Machine pinion-and-sprocket shafts, then the whole bottom-end assembly was sent out and high-speed balanced. Then we cut a groove in the pinion shaft in the bushing area to improve the flow of oil to the lower end. We also fitted a '73-and-later oil pump. It's more efficient than the '72 stocker. While the flywheels were being balanced, all the external motor components were sent out to be refinished. The motor case, heads, cylinders, and oil tank were sent to Summax to be powder-coated gloss black. The rocker covers, cam cover, and inner primary were sent to Palm Beach Plating to be chromed.
When everything came back perfect, I was pleasantly surprised. The powder coating came out better than I had imagined -- smooth as a baby's butt. After truing the flywheels to within .001", the lower end was assembled, and the cylinders and pistons were installed. The heads had been rebuilt with new valve seats, Black Diamond valves, new cast iron guides, new valve seals, and new Crane springs and collars.
The rocker boxes received some serious refurbishing with new rocker-arm shafts, bushings, and rocker arms. The valve train was polished off with an H-298B Crane cam (big lift), Crane push-rods, new lifters and lifter blocks. "They always run great right before they blow up!"
Transmutation
The transmission was next on the list. After disassembly we replaced the second-gear countershaft and the countershaft itself as well as its bushings. All the bearings were replaced, as was the fourth-gear assembly. Both of the clutches inside the tranny were replaced. Altogether, the tranny was in much better condition than the motor. We did use the old-style throw-out bearing, partially because I think the updated one belongs on a toy, not a motorcycle. After the kicker-cover, with new kicker gears, and new side cover was installed, the tranny was complete. The project was picking up steam, and I could only hope it would continue as smoothly.
Details, Details
Next, we sent the frame, swingarm, and sheet-metal to the painter. We choose a dark crimson-pearl. Six months later I got everything back. What is it about painters that makes them so messed up? I think it might be fume damage: You know, sniffing more paint than they are shooting. Sure, the finished product was great, but it should not have taken them six months. After that ordeal I put paint savers (cool little chrome rings that go around the filler holes) on the fuel tanks to protect the paint from the gas fumes.
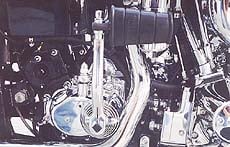
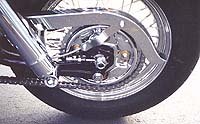
Next, I worked on the primary. I replaced the inner primary with a beefy Cal-Products unit that I had chromed. I decided to make the primary a wet-sump style similar to the later models. The old style pisses engine oil onto the primary chain and pulls clutch shrapnel back with the oil, distributing it through the motor via the oil system. To seal the starter housing I used a plate made by Jenkins Engineering, a very slick set-up. The plate utilizes a starter seal (H-D# 12053a) and mounts in-between the primary and the starter housing. The starter drive was replaced as well. I replaced the old-style clutch-hub bearings with the big fix, a kit that uses modern roller bearings around the entire clutch hub to remove any wobble, and the primary chain and shoe with stock parts. The clutch plates were replaced with Barnett wet/dry plates. Only springs and the undamaged steel plates were reused.
What is it about painters that makes them so messed up? I think it might be fume damage: You know, sniffing more paint than they are shooting.
Assembly
Thank God for internal fork stop kits.
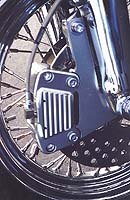
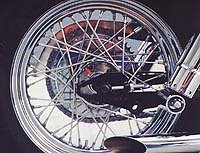
On the rear wheel I replaced the brake shoes and chromed the drum and backing plate. For the front brakes I used a Russell stainless-steel rotor with a two piston GMA caliper. Wow, this thing might actually stop. Old H-D calipers are notorious for their leaden feel. I replaced the old shocks with full chrome-covered ones from Progressive Suspension. After the rolling chassis was complete I put the motor and tranny into the frame.
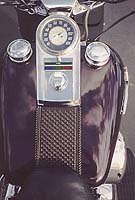
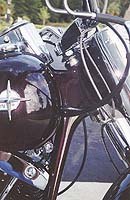
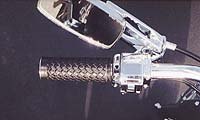
To bring the bike into the nineties we put in an updated alternator kit to increase the charging system to 22 amps. For the last of it we installed chrome o-ring passenger pegs and a chrome chain guard. The grips, seat, and tank panel were hand-made by Larry Bryant, one of the techs at Savannah Harley-Davidson.
After several thousand dollars and one year-and-a-half of ulcers and headaches, the bike was finally finished. Unbelievable! The old adage held true: No pain, no gain. This bike was all about gain. Funny thing is, I sold it three months after I finished it. I think next time I might do something really radical.
Know of any basket cases?
The old adage held true: No pain, no gain. This bike was all about gain.
Specifications:
OWNER: DAVE FEENEYCITY: SAVANNAH, GAGENERALYEAR/MAKE: 1972 FLH HARLEY-DAVIDSONASSEMBLY: OWNER / FRED JENKINSTIME: 14 MONTHSCHROMING: PALM BEACH PLATINGPOWDER-COATING: SUMMAXENGINEBUILDER: FRED JENKINSSTYLE: 72 SHOVELDISPLACEMENT: 1200CCIGNITION: 1996 ELECTRONIC / SCREAMING EAGLE COIL AND MODULELOWER END: STOCK HARLEY / HIGH SPEED BALANCEDPISTONS: HARLEY / HASTINGS RINGSCASES: HARLEY / POWDER-COATEDHEADS: HARLEY / POWDER-COATEDCYLINDERS: HARLEY / POWDER-COATEDVALVES: BLACK DIAMONDCAM: CRANE H298-B 440 LIFTLIFTERS: HARLEY HYDRAULICCARB: 40MM CV KEIHINAIR CLEANER: SCREAMING EAGLE HI-FLOW KITPIPES: CYCLE SHACK 1 3/4" DRAGS
MOLDING: THE BODY SHOPPAINTER: THE BODY SHOPCOLOR: DARK CRIMSON-PEARLTYPE: PPGFRAMEYEAR: 1972BUILDER: HARLEY-DAVIDSONTYPE: SWINGARMACCESSORIESBARS: STAINLESS ROADSTER BARSFENDERS: STOCK FLHFUEL TANKS: LATE MODEL RUBBER MOUNTEDHEADLIGHT: RICK DOSS FLH HOUSINGOIL TANK: WRAP AROUND / POWDERCOATEDPRIMARY COVER: DRAG SPECIALTIESSEAT: LARRY BRYANTTANK PANEL: LARRY BRYANTMIRRORS: CCI MIRAGEGRIPS: LARRY BRYANTFORKSTYPE: FLH ELECTRAGLIDECHROMED LOWER LEGS AND HOUSINGWHEELSSIZE: 16" STAINLESS SPOKESHUBS: CHROMETIRE: DUNLOP 402BRAKES: FRONT GMA DUAL PISTONREAR DRUM / CHROMED DRUM AND BACKING PLATESTAINLESS BRAIDED BRAKE LINES
More by Dave Feeney, Contributing Writer


Comments
Join the conversation